1. Getting Started
Weblock is a special browser that your parent has installed to help keep you safe online. It works like Safari or other browsers, but with extra safety features that protect you from harmful content.
What You'll Need
Before you begin, make sure you have:
- Your iPhone or iPad (the device you'll use for browsing)
- Weblock app installed (your parent should have helped with this)
- Internet connection (Wi-Fi or cellular data)
- Your parent nearby with their device ready
Weblock is designed to:
- Block harmful websites automatically - You won't accidentally see bad content
- Let your parent approve new websites - If you want to visit a new site, your parent can check it first
- Keep track of where you browse - Your parent can see your browsing history to help if something goes wrong
- Provide safe bookmarks - Your parent can save approved websites for you to visit anytime
Important
Weblock isn't about not trusting you—it's about keeping you safe from the dangerous parts of the internet that even adults want to avoid!
2. Choosing Your Device Role
The first step is letting the Weblock app know that this is your device (not your parent's device). This will set up the safe browser on your device.
Open Weblock
When you open the Weblock app for the first time, you'll see a welcome screen. Tap "Get Started" to begin setting up.
Select "Child" Role
You'll see a screen asking "Which device is this?" with two options:
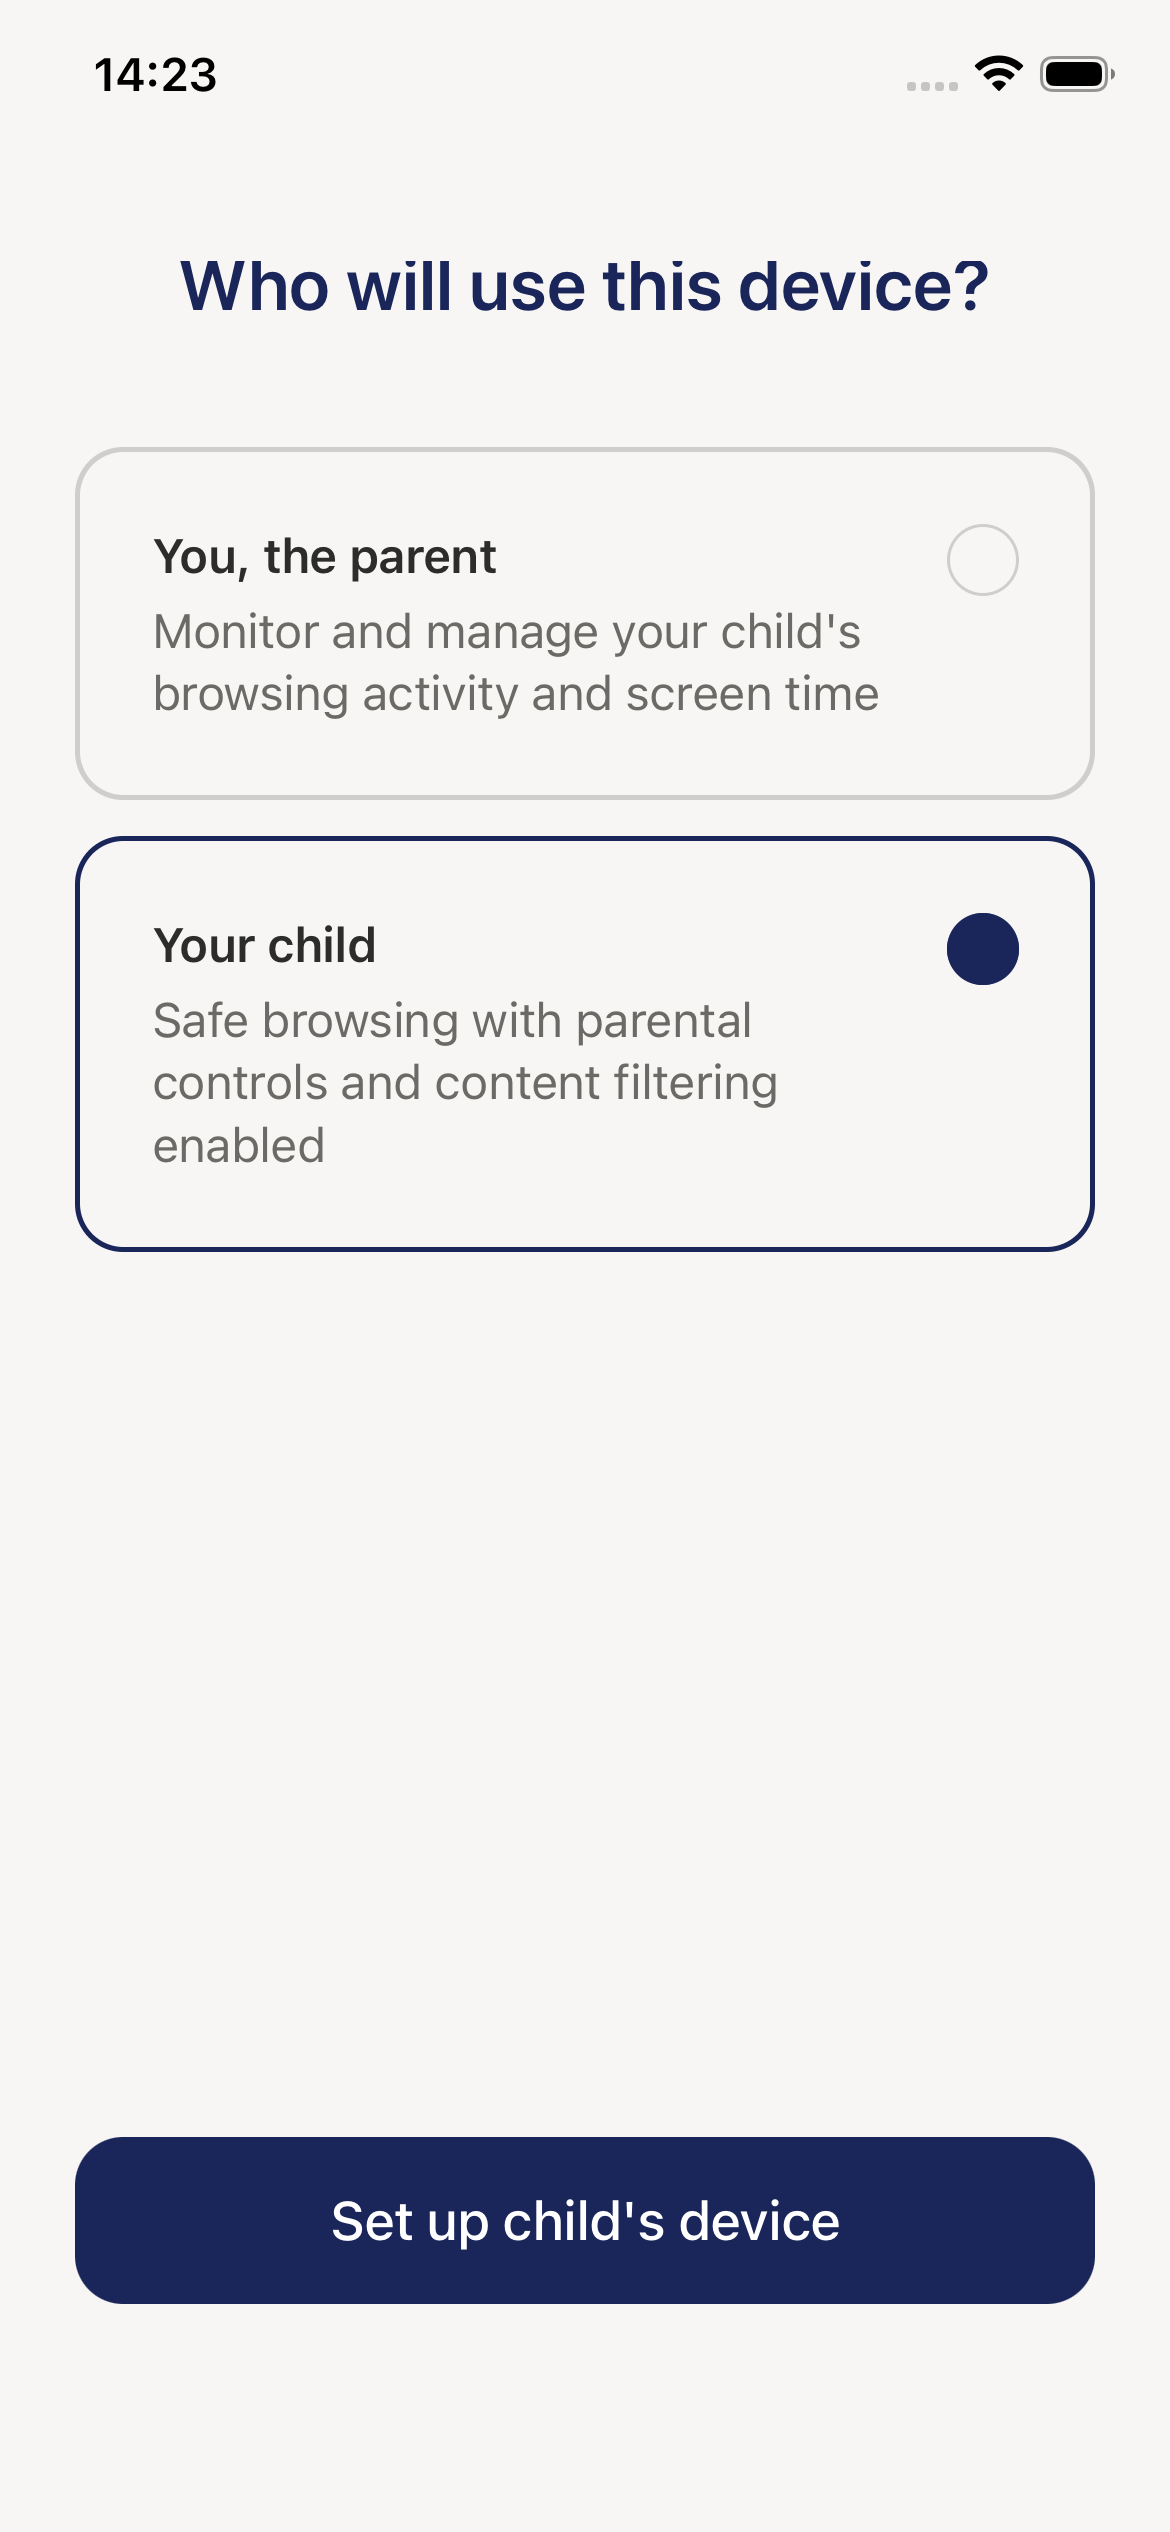
You'll see two options:
-
Child (radio button)
- Caption: "Web browsing will be restricted and controlled on this device"
- ✅ Select this option for your device
-
Parent (radio button)
- Caption: "This device will observe and control child's browsing on another device"
- ⚠️ This is for your parent's device only!
Tap "Next"
After selecting "Child", tap the "Next" button. The app will:
- Set up your device as a safe browser
- Save this choice (you won't see this screen again)
- Take you to the main screen
The Main Screen (Before Pairing)
You'll see the main screen with a "Pair" button:
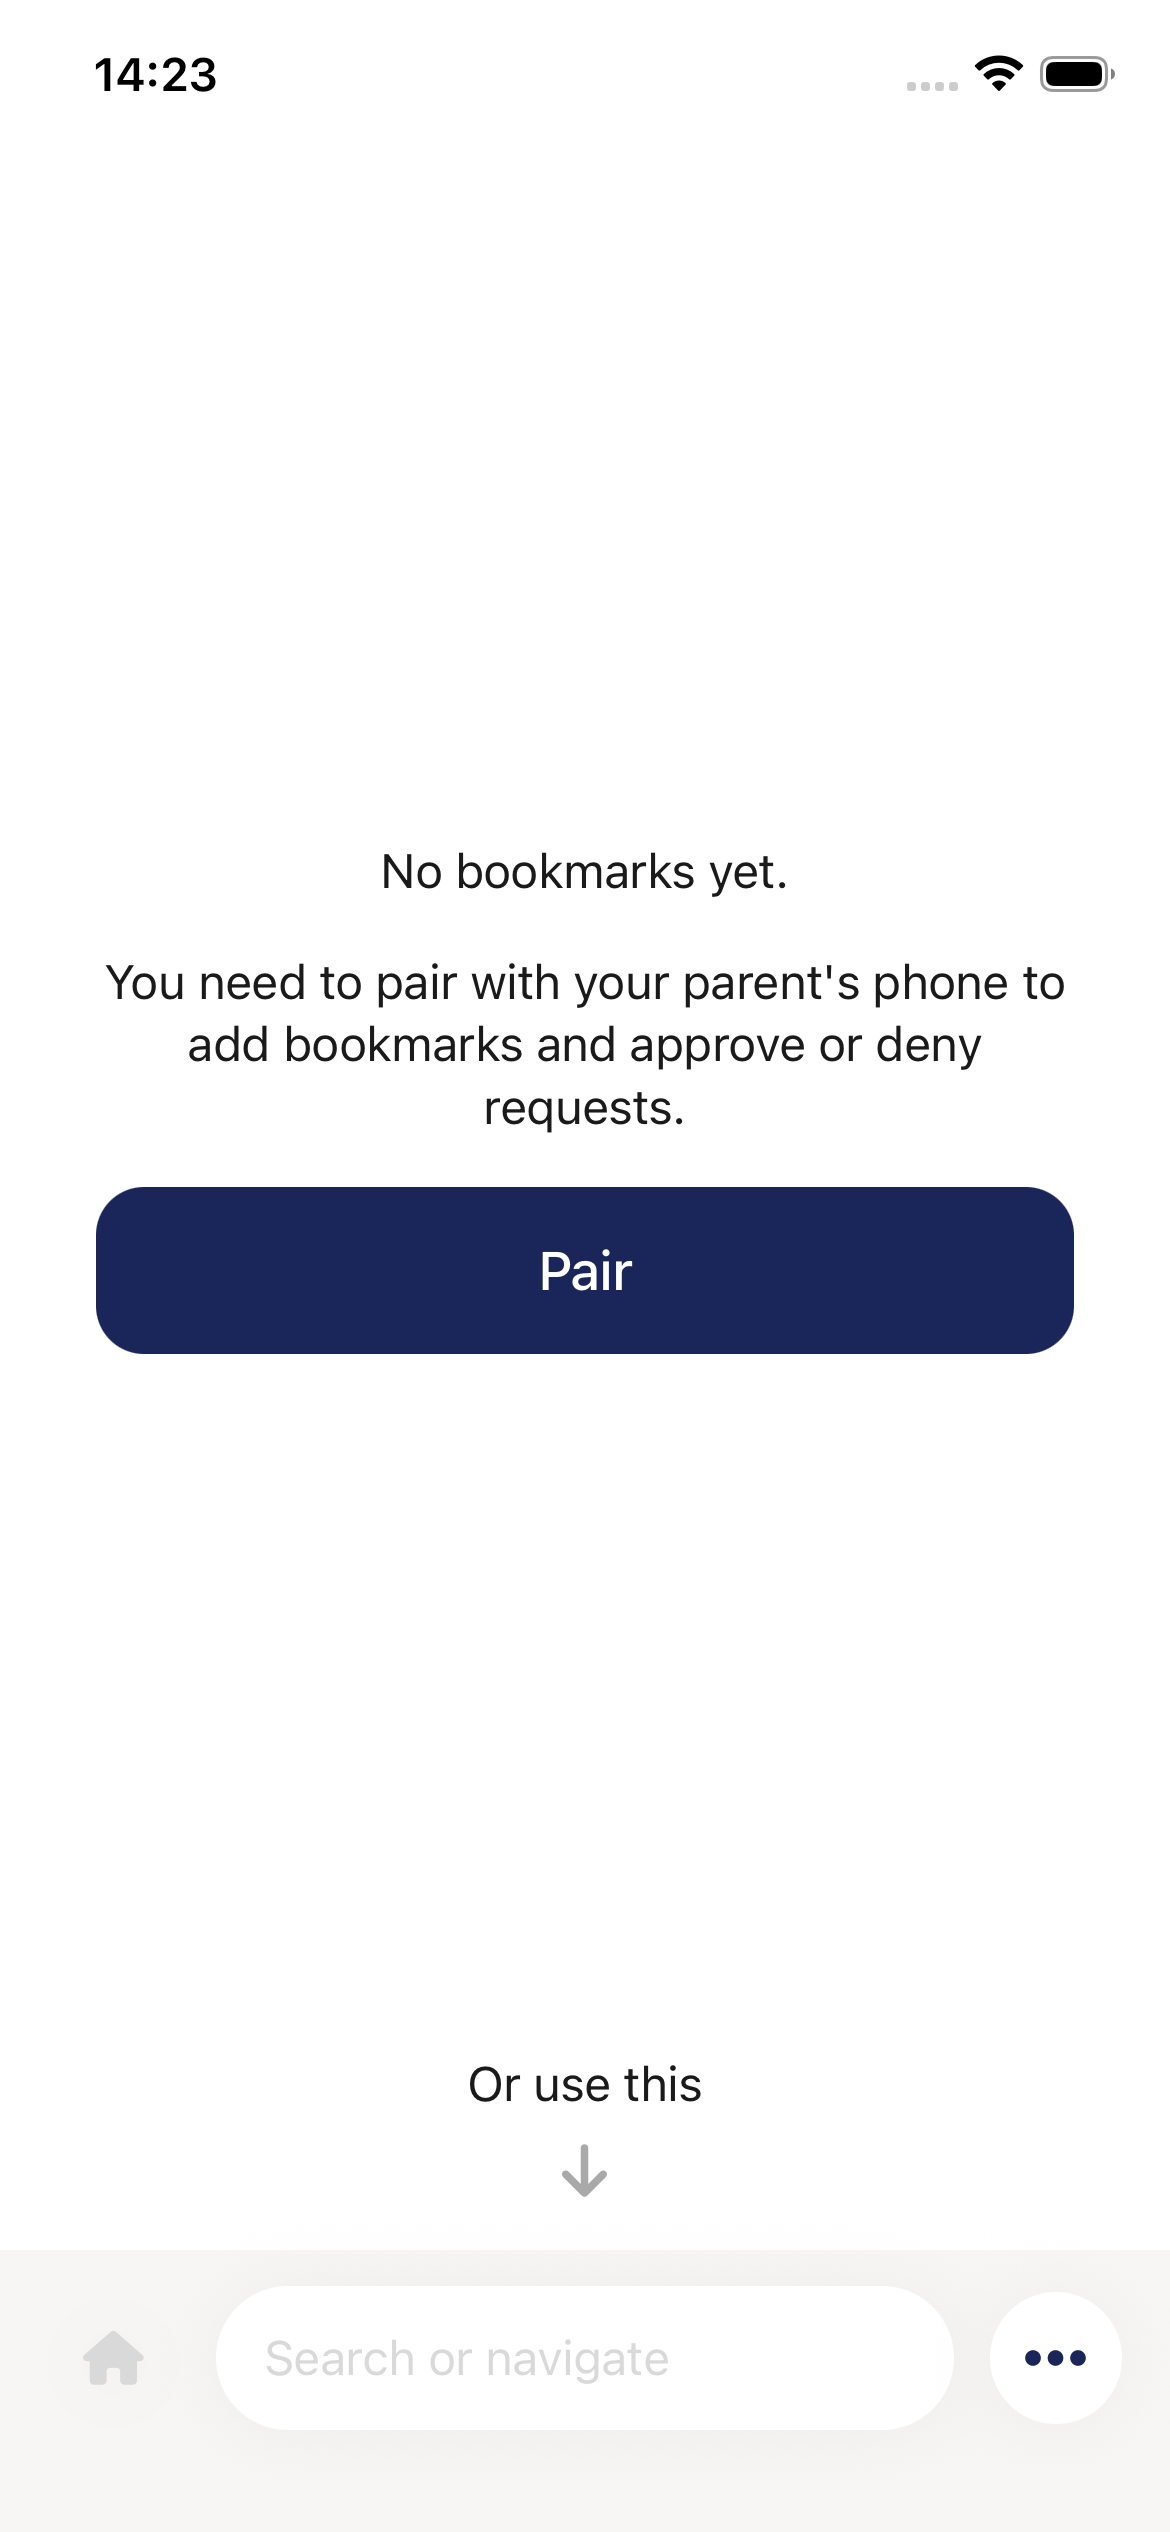
- The browser isn't available yet (you need to pair first)
- Tap the "Pair" button to continue
What Happens Next
After tapping the "Pair" button, you'll see a special QR code on your screen. Your parent will scan this code with their device to connect the two devices together. We'll explain this in the next section: Connecting with Your Parent.
What does "restricted and controlled" mean?
- Restricted: Some websites that could be harmful are automatically blocked
- Controlled: Your parent can see what you're browsing and approve new websites
- This is normal! Most kids using Weblock have the same setup—it's to keep everyone safe
Can I change this later?
- No, once you select "Child's device," this setting is permanent
- If you picked the wrong option by mistake, ask your parent to reinstall the app
- Make sure you pick "Child's device" on your device!
Will I still be able to browse websites?
- Yes! You can browse many websites freely
- Safe and approved websites work normally
- If a website is blocked or new, you can ask your parent for permission
- Your parent can add websites to your bookmarks for easy access
3. Connecting with Your Parent
After tapping the "Pair" button, you'll see the QR code screen. This is how your device connects with your parent's device so they can help keep you safe.
The QR Code Screen
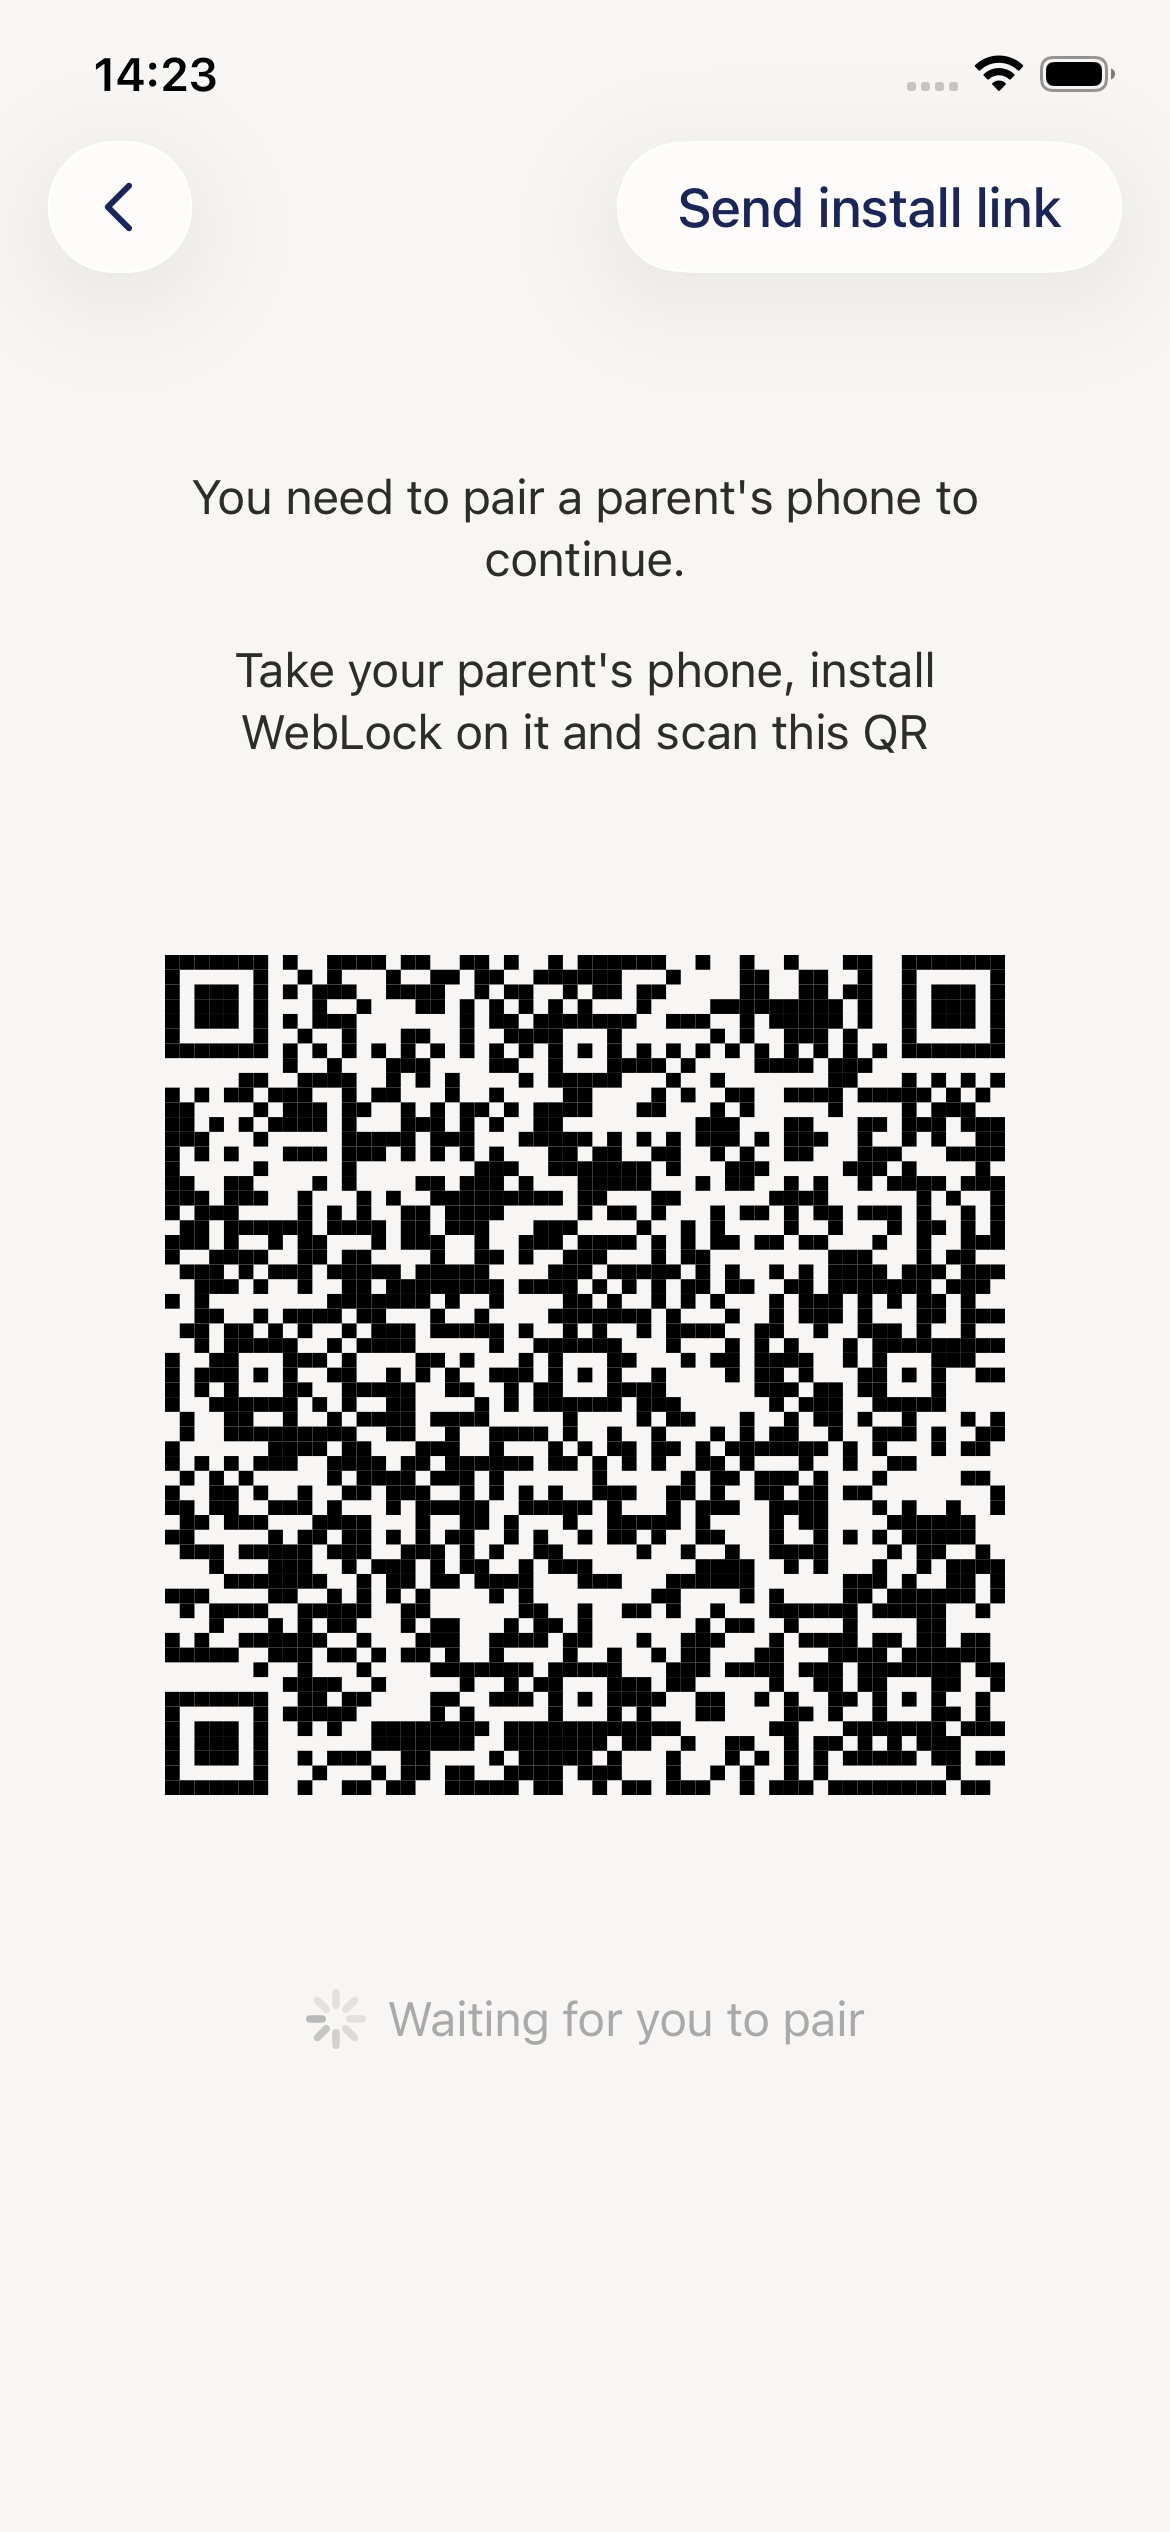
When you see this screen, you'll notice:
- "Back" button (top left) - Tap this if you need to go back to the previous screen
- "Share app" button (top right) - Your parent can use this to install Weblock on their device if they haven't already
- Instruction text - "Take your (parent's) phone, install Weblock on it and scan this QR:"
- Large QR code - This is what your parent needs to scan with their camera
- "Waiting for you to pair" message - Shows the app is ready and waiting
What to Do Now
Follow these steps:
Step 1: Keep Your Screen On
- Make sure your device screen stays bright and doesn't go to sleep
- Don't lock your device or switch to another app
- The QR code needs to stay visible for your parent to scan it
Step 2: Show the QR Code to Your Parent
- Hand your device to your parent or hold it steady so they can see the screen
- Make sure there's good lighting so the camera can read the QR code clearly
- The QR code should be easy to see and not blocked by anything
Step 3: Wait for Your Parent to Scan
- Your parent will use their device's camera to scan this QR code
- You'll see the "Waiting for you to pair" message with a spinner while you wait
- This usually takes just a few seconds
Step 4: Automatic Connection
- Once your parent successfully scans the QR code, the connection happens automatically
- You don't need to tap anything—the app will do it for you
- Your device will automatically move to the next screen when pairing is complete
When your parent scans the QR code:
- The two devices securely connect to each other
- Your parent's device is set up as the "control" device
- Your device is set up as the "safe browser"
- The connection is saved so you won't need to do this again
What if the QR code won't scan?
- Increase your screen brightness to maximum
- Make sure the screen is clean (no fingerprints or smudges)
- Try holding the device steady in better lighting
- Make sure your parent's camera is focused on the QR code
What if it's taking too long?
- Check that both devices have internet connection
- Make sure your parent has completed the setup steps on their device
- Try tapping the "Back" button and starting again
What if I accidentally go back?
- Don't worry! You can tap "Child's device" again
- You'll see a new QR code appear
- Just have your parent scan the new code
After Successful Pairing
Once the pairing is complete:
- Your device will automatically go to the main browser screen
- You'll be able to start browsing safely
- Your parent will be able to see your browsing activity on their device
- The two devices will stay connected (even when apart)
4. Using the Browser
After pairing with your parent's device, you'll see the main browser screen. This is where you can browse websites and access your bookmarks.
The Main Screen
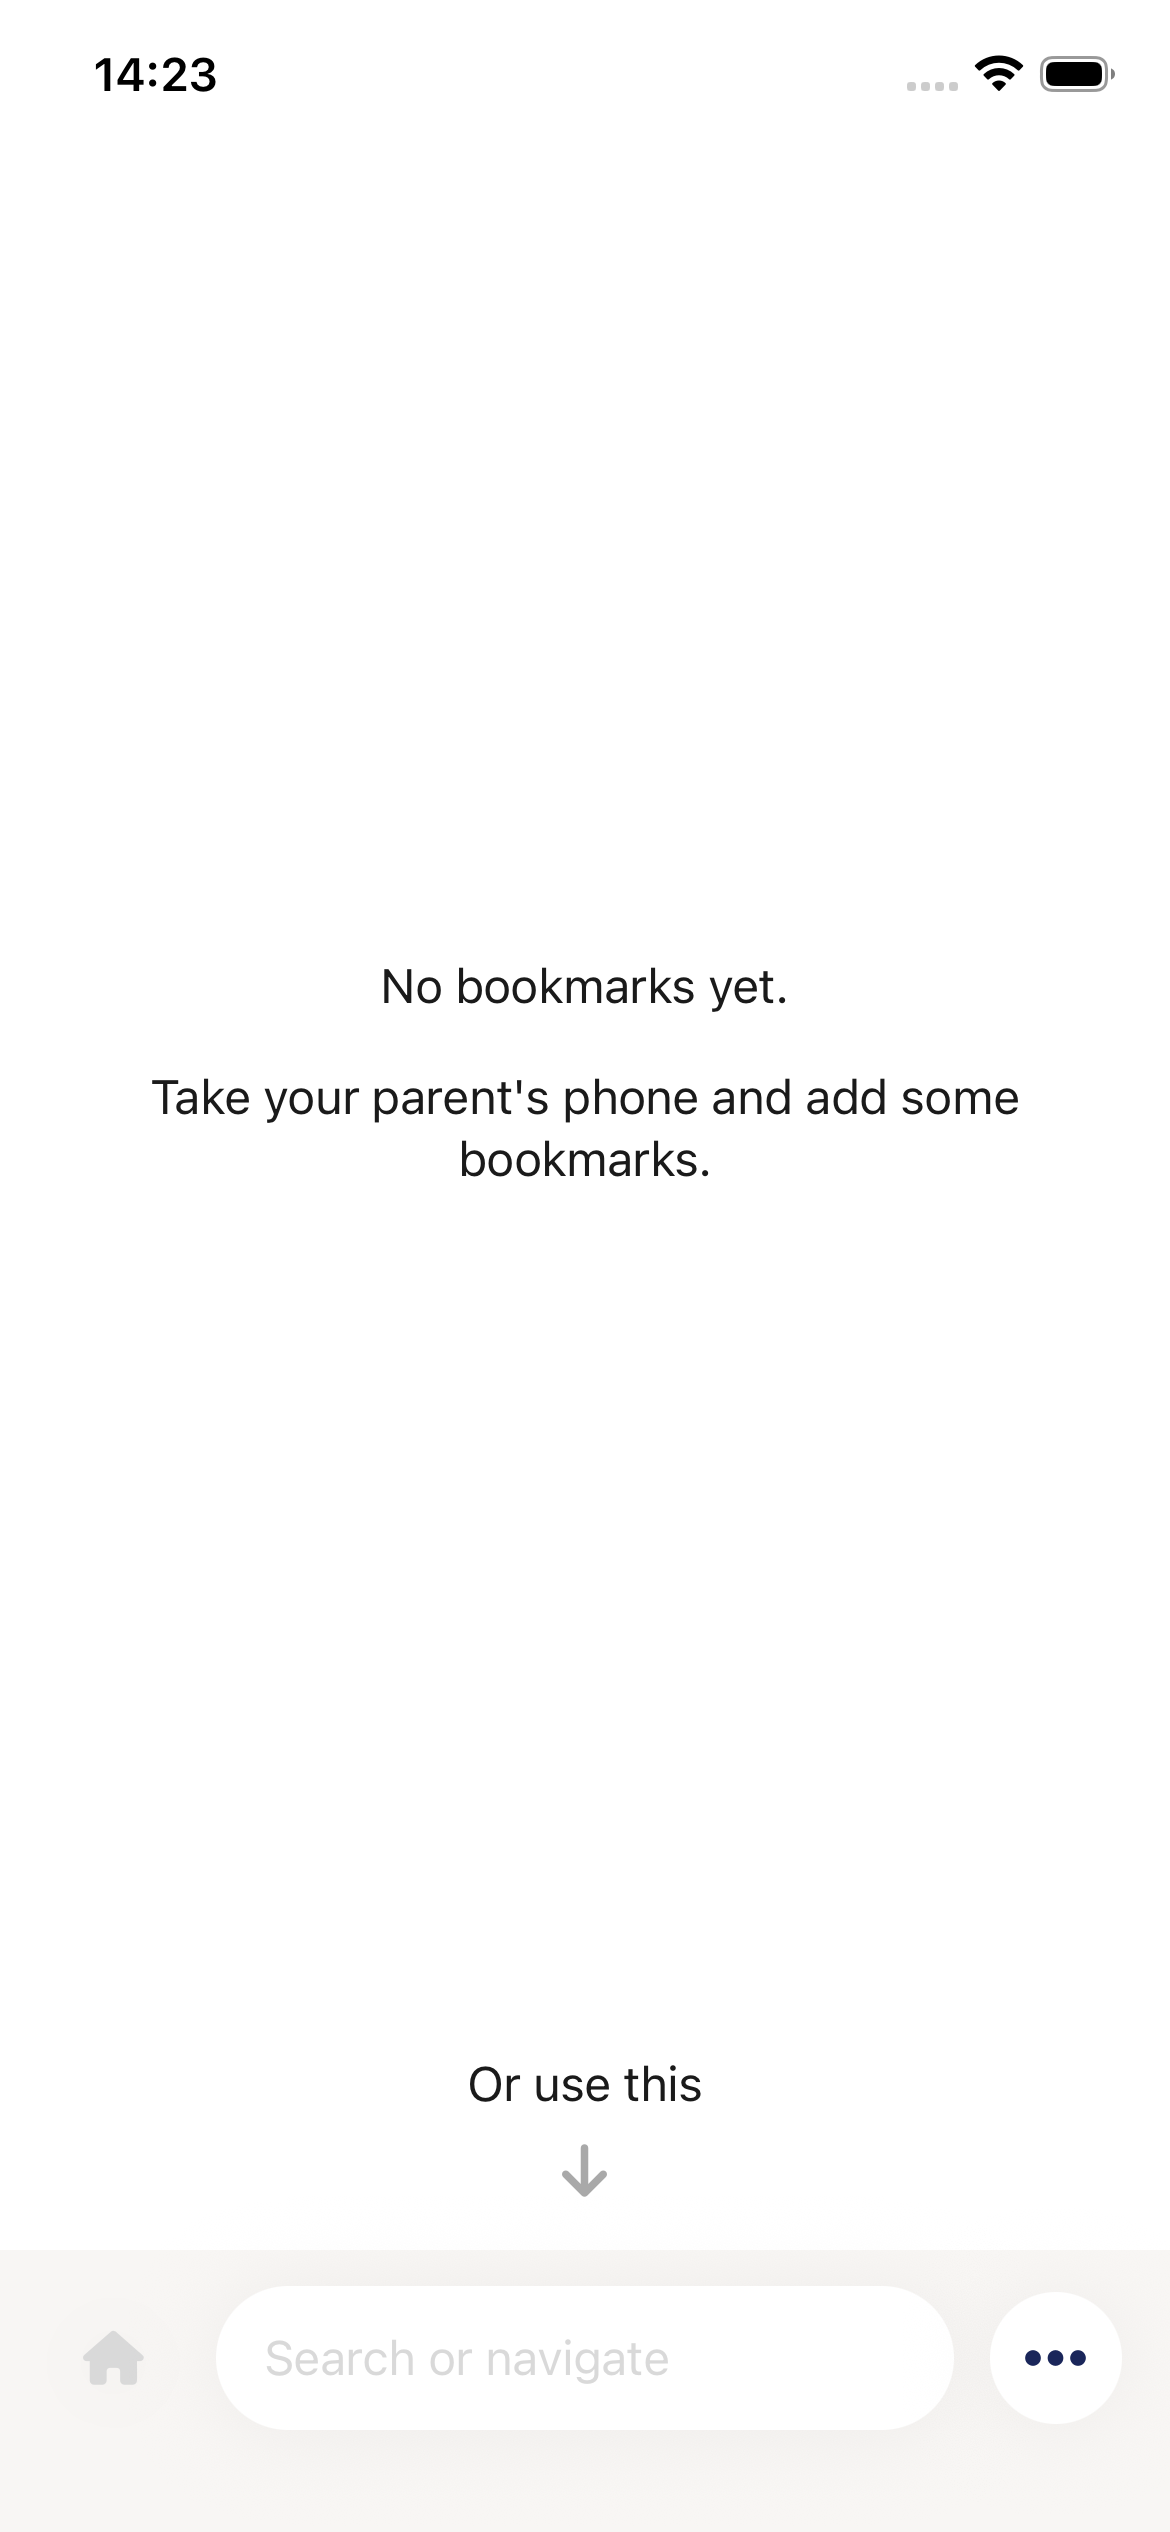
When you open Weblock, you'll see:
- Your bookmarks list - Websites your parent has approved for you
- Each bookmark shows a picture (icon), the website name, and its address
- Tap any bookmark to visit that website
- Home button (bottom left) - Takes you back to this bookmark list
- Address bar (bottom center) - Type here to search or enter a website address
- Menu button (bottom right, three lines) - Opens additional options
Browsing with Bookmarks
Your bookmarks are websites your parent has approved for you. They appear on your home screen so you can easily access them.
To visit a bookmarked website:
- Find the website in your list (like "Khan Academy" or "PBS Kids")
- Tap on it
- The website will load automatically
To return home:
- Tap the home button (house icon) at the bottom left
- This brings you back to your bookmarks list
Using the Address Bar
The address bar at the bottom says "Search or enter address". You can use it to:
- Search for something - Type what you're looking for and press enter
- Go to a specific website - Type the website address (like "google.com")
Important
If the website isn't approved, you'll see a "Page is not allowed" message. See Requesting Access to Websites to learn how to ask your parent for permission.
The Menu Button
Tap the menu button (three horizontal lines) on the bottom right to see options like:
- About - Shows app information and settings
5. Requesting Access to Websites
Sometimes when you try to visit a website, you might see a screen saying "Page is not allowed." This happens when the website hasn't been approved yet or might not be safe. Don't worry—you can ask your parent for permission!
When You'll See the Blocked Page
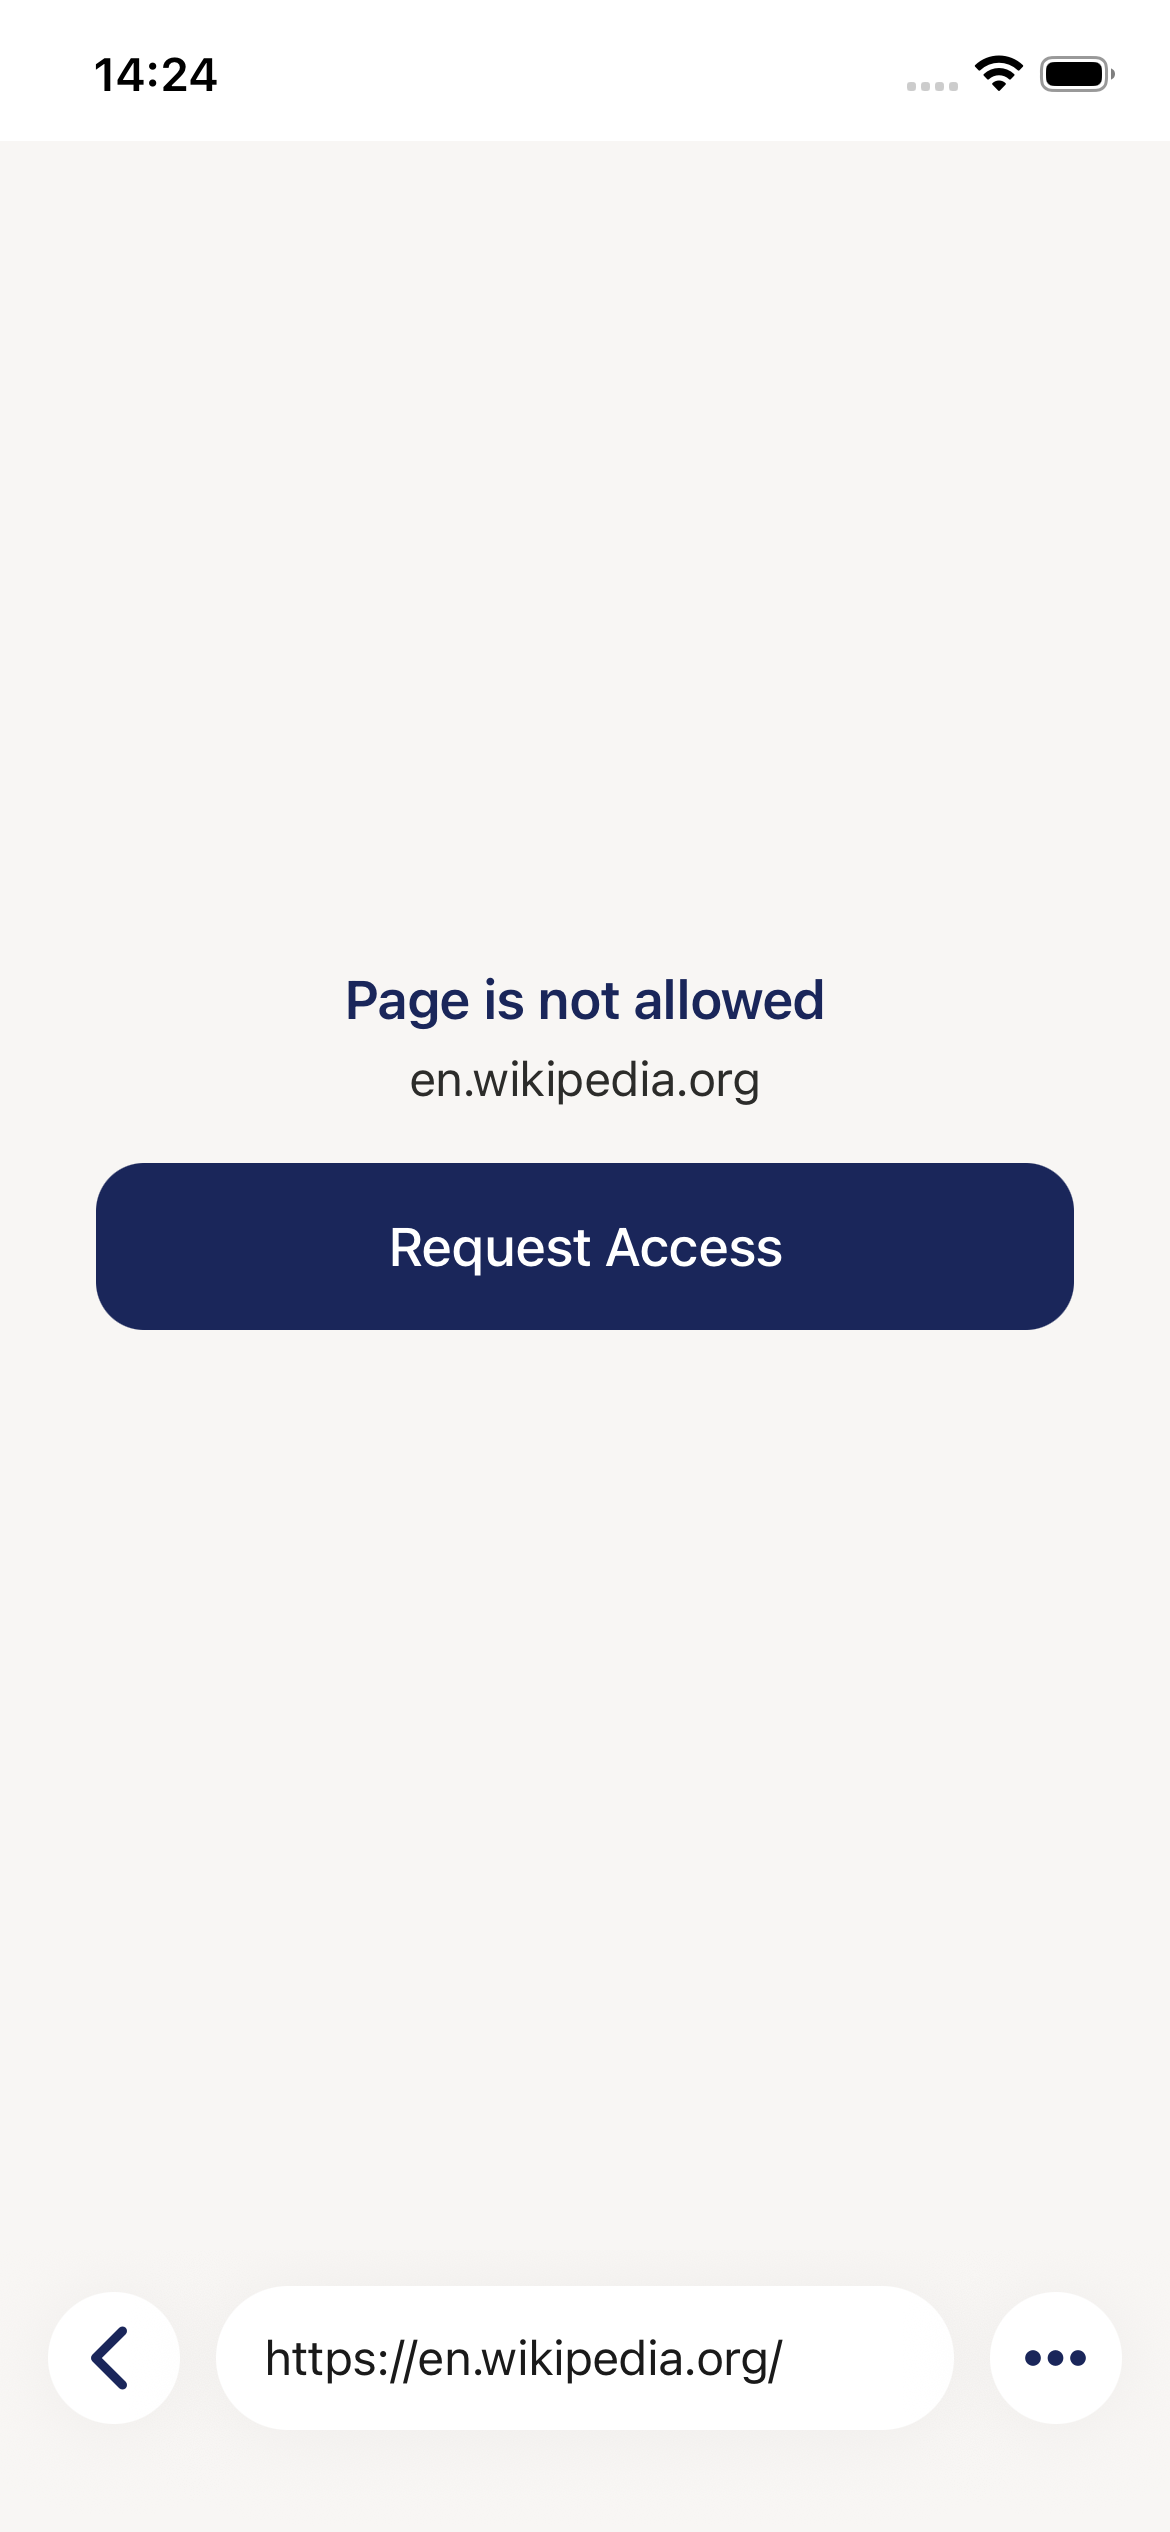
You'll see this screen when:
- You try to visit a new website that hasn't been approved yet
- The website is on a blocked list
- Your parent needs to review the site before you can access it
The screen shows:
- "Page is not allowed" heading
- The website address (domain name) you tried to visit
- Purple "Request Access" button
- Navigation buttons at the bottom (back, menu, URL bar)
How to Request Access
Step 1: Read the Message
- Look at the website address shown on the screen
- Make sure this is the website you actually want to visit
- Think about why you need to visit this website
Step 2: Tap "Request Access"
- Tap the purple "Request Access" button
- The button will change to show you're waiting for a response
Step 3: Wait for Your Parent's Response
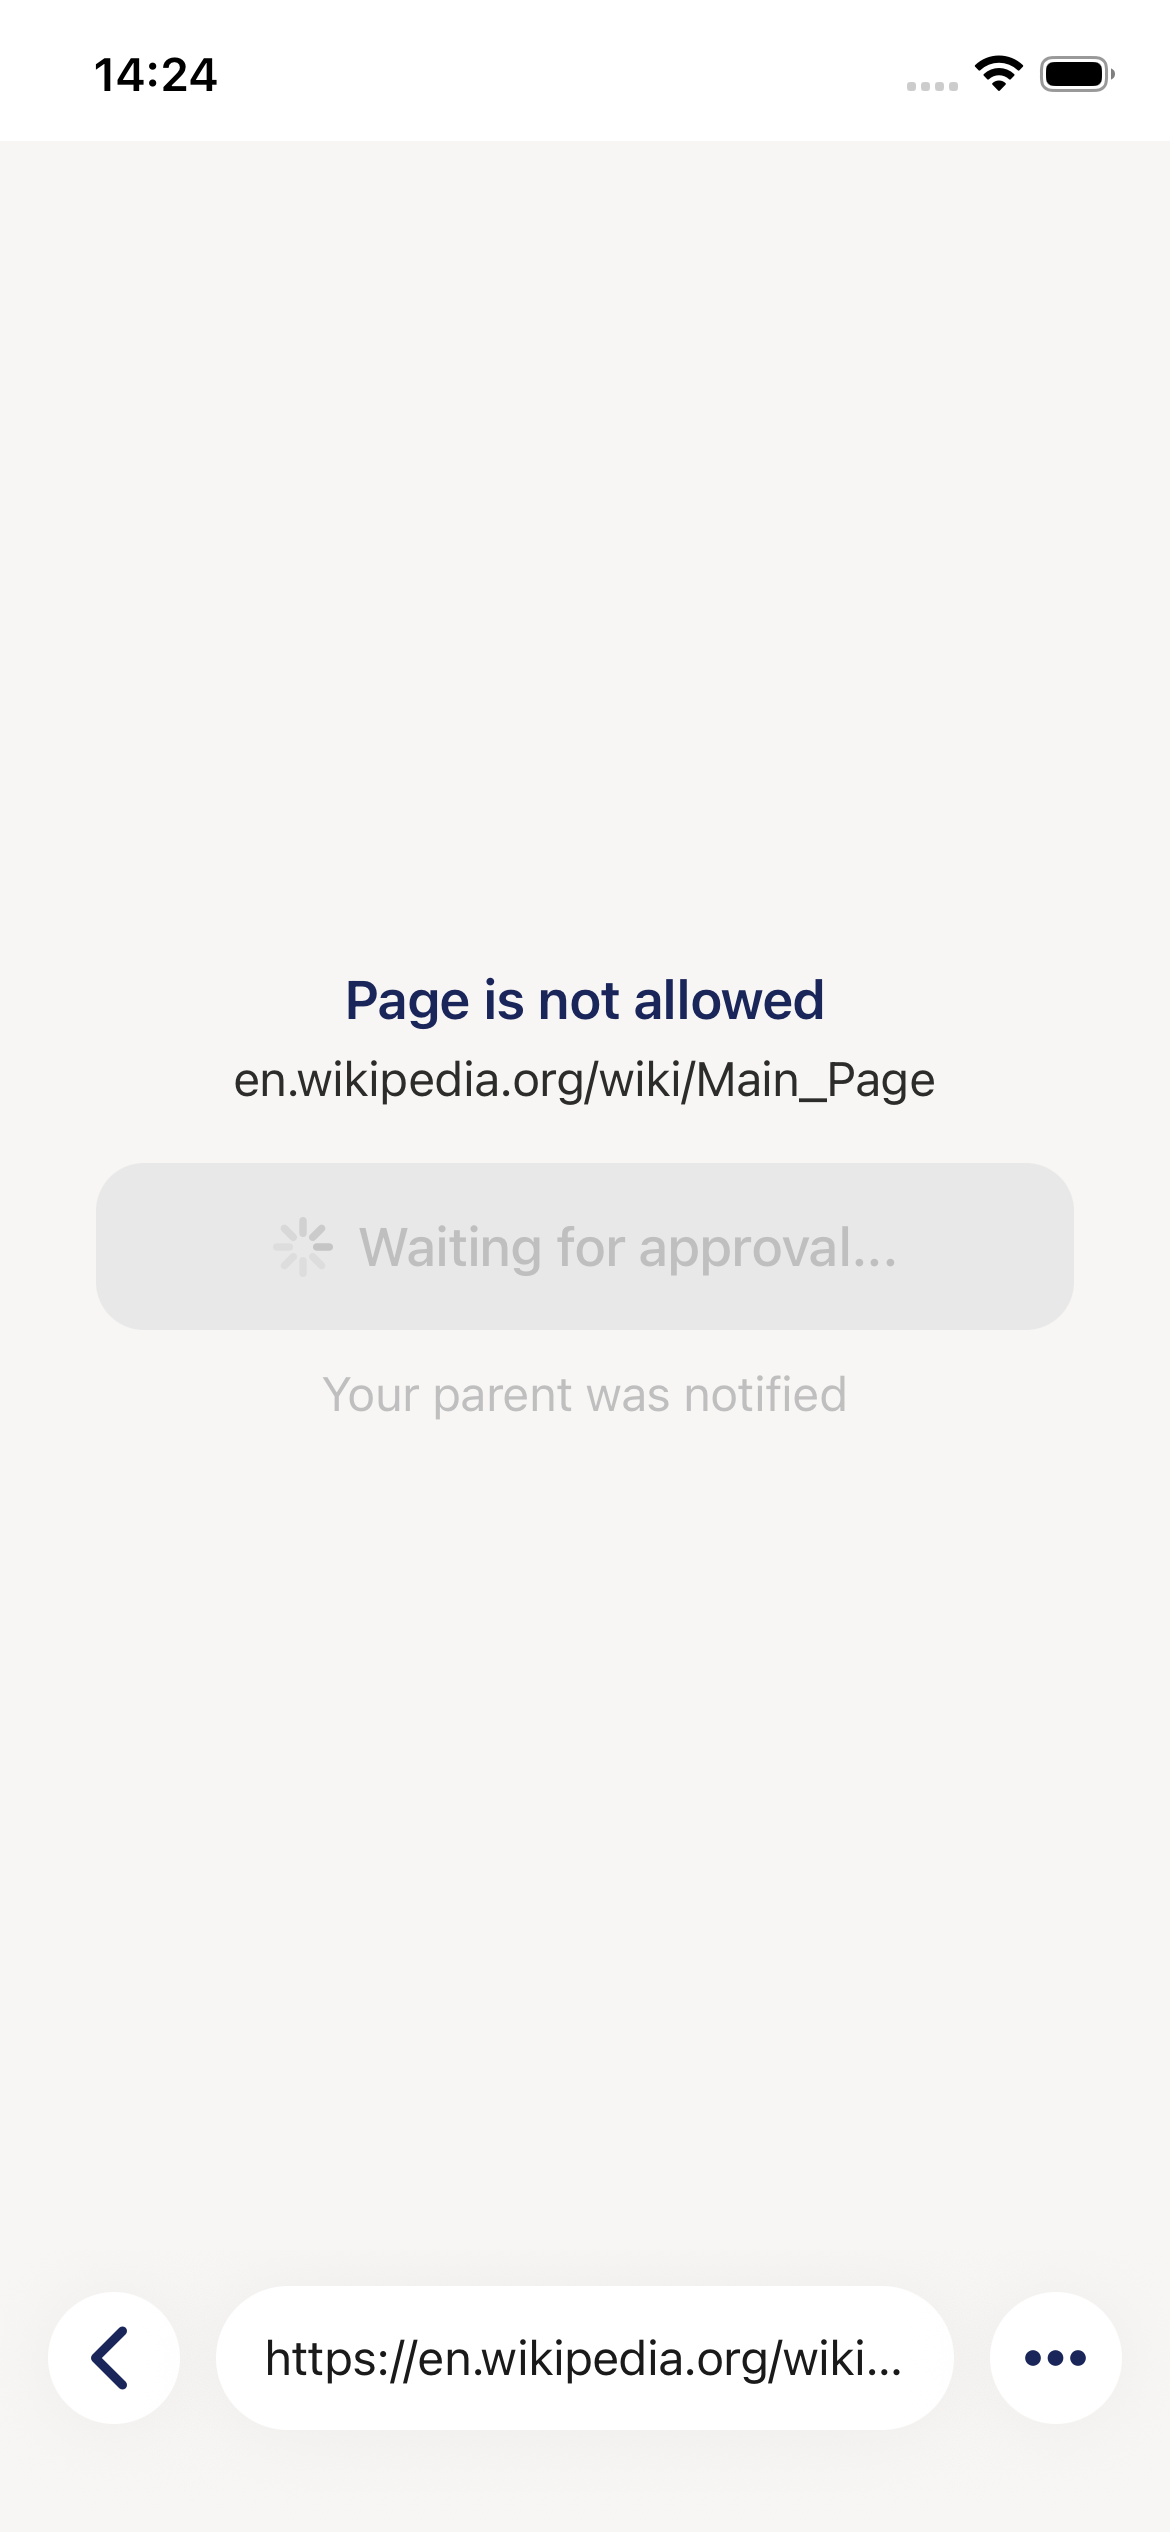
After you tap the button:
- The button changes to "Waiting for approval..." with a spinning icon
- Your parent will receive a notification on their device
- You need to wait for your parent to review your request
- You can go back and continue browsing other approved websites while you wait
What Happens Next
Your Parent's Options
Your parent will see your request and can:
- Approve it - You'll be able to visit the website right away
- Approve temporarily - You can visit the website for a limited time (like 1 hour or 1 day)
- Deny it - The website will stay blocked, and your parent will explain why
- Add as bookmark - Your parent might approve it permanently and add it to your bookmarks
How long does it take?
- It depends on when your parent checks their device
- Usually a few minutes if they're available
- Sometimes longer if they're busy
- Be patient—your parent wants to make sure the website is safe!
Tips for Requesting Access
Do:
- Only request websites you actually need for homework, projects, or appropriate entertainment
- Be ready to explain why you want to visit the website
- Be patient while waiting for approval
- Accept your parent's decision respectfully
- Ask your parent about their concerns if a site is denied
Don't:
- Spam the request button multiple times (it won't make it faster!)
- Request websites just to test the system
- Get upset if a request is denied—talk to your parent about it
- Try to find ways around the block
- Request inappropriate websites (your parent will see the URL!)
If your parent denies your request:
- Talk to them - Ask why the website wasn't approved
- Learn from it - Understanding the reason helps you make better choices
- Suggest alternatives - Maybe there's a safer website with similar content
- Accept the decision - Your parent is trying to keep you safe
Remember: A denied request isn't a punishment—it's your parent doing their job to protect you online!
Can I visit the website while waiting for approval?
- No, you need to wait for your parent to approve it first
- You can browse other approved websites in the meantime
- Tap the back button to return to your previous page
What if my parent doesn't respond?
- Give them some time—they might be busy
- You can ask them in person to check their device
- They'll see your request as soon as they open Weblock
Can I cancel a request?
- Once sent, requests stay pending until your parent responds
- If you change your mind, just let your parent know
- They can deny the request if you no longer need it
Will all my requests be approved?
- Not necessarily—it depends on the website and your parent's rules
- Educational websites are usually approved quickly
- Entertainment websites might need more discussion
- Inappropriate websites will always be denied
6. Using Bookmarks
Bookmarks are websites your parent has pre-approved for you. They're like a special list of safe places on the internet that you can visit anytime!
What Are Bookmarks?
Think of bookmarks as shortcuts to your favorite approved websites. Your parent creates these for you so you can:
- Visit approved sites with just one tap
- Easily find websites you use often
- Browse safely without needing to request access each time
Finding Your Bookmarks
Your bookmarks appear on the main screen when you open Weblock:
- Each bookmark shows the website's icon (favicon) and name
- Tap any bookmark to visit that website instantly
- Scroll down if you have lots of bookmarks
The Star Icon
When you're browsing a website, look for the star icon:
- A filled star means this website is bookmarked
- This tells you your parent has specifically approved this site
- Bookmarked pages load right away without asking for approval
Temporary Bookmarks
Some bookmarks might be temporary:
- Your parent may approve a website for a limited time (like for a school project)
- When the time expires, you'll see the blocked page again
- You can request access again if you still need the website
- Your parent can always extend the time if needed
Do:
- Use bookmarks for websites you visit regularly
- Tell your parent if there's a new website you'd like bookmarked
- Check your bookmarks first before typing a web address
Don't:
- Expect every website to be bookmarked
- Be upset if a temporary bookmark expires—just ask again!
For more about how bookmarks are managed, your parent can read the Managing Bookmarks section in the Parent's Guide.
7. Understanding Website Blocks
Sometimes when you try to visit a website, you'll see a message saying "Page is not allowed." This section explains why that happens and what it means.
Why Do Websites Get Blocked?
Websites are blocked to keep you safe. Your parent has set up Weblock to:
- Protect you from websites that might have inappropriate content
- Keep you safe from scammers and dangerous people online
- Help you focus by limiting distracting websites during homework time
What You'll See
When a website is blocked, you'll see a page that says:
- "Page is not allowed" at the top
- The website address you tried to visit
- A "Request Access" button if you need to visit the site
What to Do
If you really need to visit a blocked website:
- Think first — Do you actually need this website? Is there an alternative?
- Request access — Tap the "Request Access" button (see Requesting Access to Websites)
- Be patient — Wait for your parent to review your request
- Accept the outcome — If denied, talk to your parent about why
It's Not About Trust
Remember: Having websites blocked doesn't mean your parent doesn't trust you. It means:
- They care about your safety
- They want to help you make good choices online
- Some websites aren't appropriate for your age
- Even adults use content filters sometimes!
Common Questions
Why was this website blocked?
- Weblock checks websites against safety rules your parent set
- Some websites are blocked automatically because they might be unsafe
- Others are blocked until your parent has a chance to review them
Can I unblock websites myself?
- No, only your parent can approve websites
- This is a safety feature, not a limitation
What if I accidentally see something bad?
- Tell your parent right away
- You won't get in trouble for accidents
- It helps your parent update the safety rules
Tips for Using Weblock
Before You Continue
- Have your parent nearby: You'll need them to scan the QR code in the next step
- Keep your device unlocked: Don't let the screen go to sleep during setup
- Be patient: The connection might take a few seconds
Do:
- Ask for permission if you want to visit a new website
- Tell your parent if you accidentally see something inappropriate
- Use your bookmarks for websites you visit often
- Be honest about your browsing activity
- Talk to your parent if you don't understand why a site is blocked
Don't:
- Try to uninstall or bypass Weblock (it won't work and will alert your parent)
- Get upset if a request is denied—talk to your parent about why
- Share your device with friends who might browse inappropriate content
- Be afraid to ask questions about internet safety
Weblock helps protect you because:
- The internet has dangerous content: Even accidentally, you could see things that are scary, inappropriate, or harmful
- Scammers target kids: Bad people try to trick children online—Weblock helps stop them
- Age-appropriate content: Some content is fine for adults but not for kids
- Learning safe habits: Weblock teaches you to think before clicking and to ask for help when unsure
Remember
Having parental controls doesn't mean your parent doesn't trust you. It means they love you and want to keep you safe—just like wearing a seatbelt in a car!
Next Steps
Now that you've set up your device, you're ready to:
- Show the QR code to your parent - They'll scan it to connect your devices (documentation continues as more screenshots are added)
- Wait for the connection - This should only take a few seconds
- Start browsing safely - Once connected, you can start using Weblock!
More Instructions Coming Soon
This guide is being updated with more screenshots and step-by-step instructions. Check back soon for complete help on browsing, requesting access, using bookmarks, and more!
Questions?
If you have questions about:
- How Weblock works - Ask your parent to explain
- Why a website is blocked - Talk to your parent about it
- Technical problems - Your parent can contact Weblock support
Remember
Your parent is there to help you stay safe and learn to use the internet responsibly!