1. Getting Started
Weblock helps you create a safe browsing environment for your child by giving you remote monitoring and control capabilities. You'll use your own iPhone or iPad to supervise your child's device.
What You'll Need
Before you begin, make sure you have:
- Two devices: Your iPhone/iPad (parent device) and your child's iPhone/iPad (child device)
- Weblock app installed on both devices (download from App Store)
- Internet connection on both devices (Wi-Fi or cellular data)
- 5 minutes for the initial setup process
Your Device (Parent)
Acts as the control center where you can:
- View everything your child browses
- Approve or block website access requests
- Manage bookmarks and safe websites
- Set up time limits and restrictions
Your Child's Device
Runs a safe browser that:
- Blocks inappropriate content automatically
- Asks your permission before accessing new websites
- Records all browsing activity
- Cannot be bypassed or uninstalled without your password
2. Choosing Your Device Role
The first step after installing Weblock is telling the app which device you're using. This determines whether you'll see the parent control dashboard or the child browser interface.
Open Weblock
When you first open the Weblock app on your device, you'll see a welcome screen. Tap "Get Started" or "Start" to begin the setup process.
Select "Parent's Device"
You'll now see a screen titled "Which device is this?" with two options:
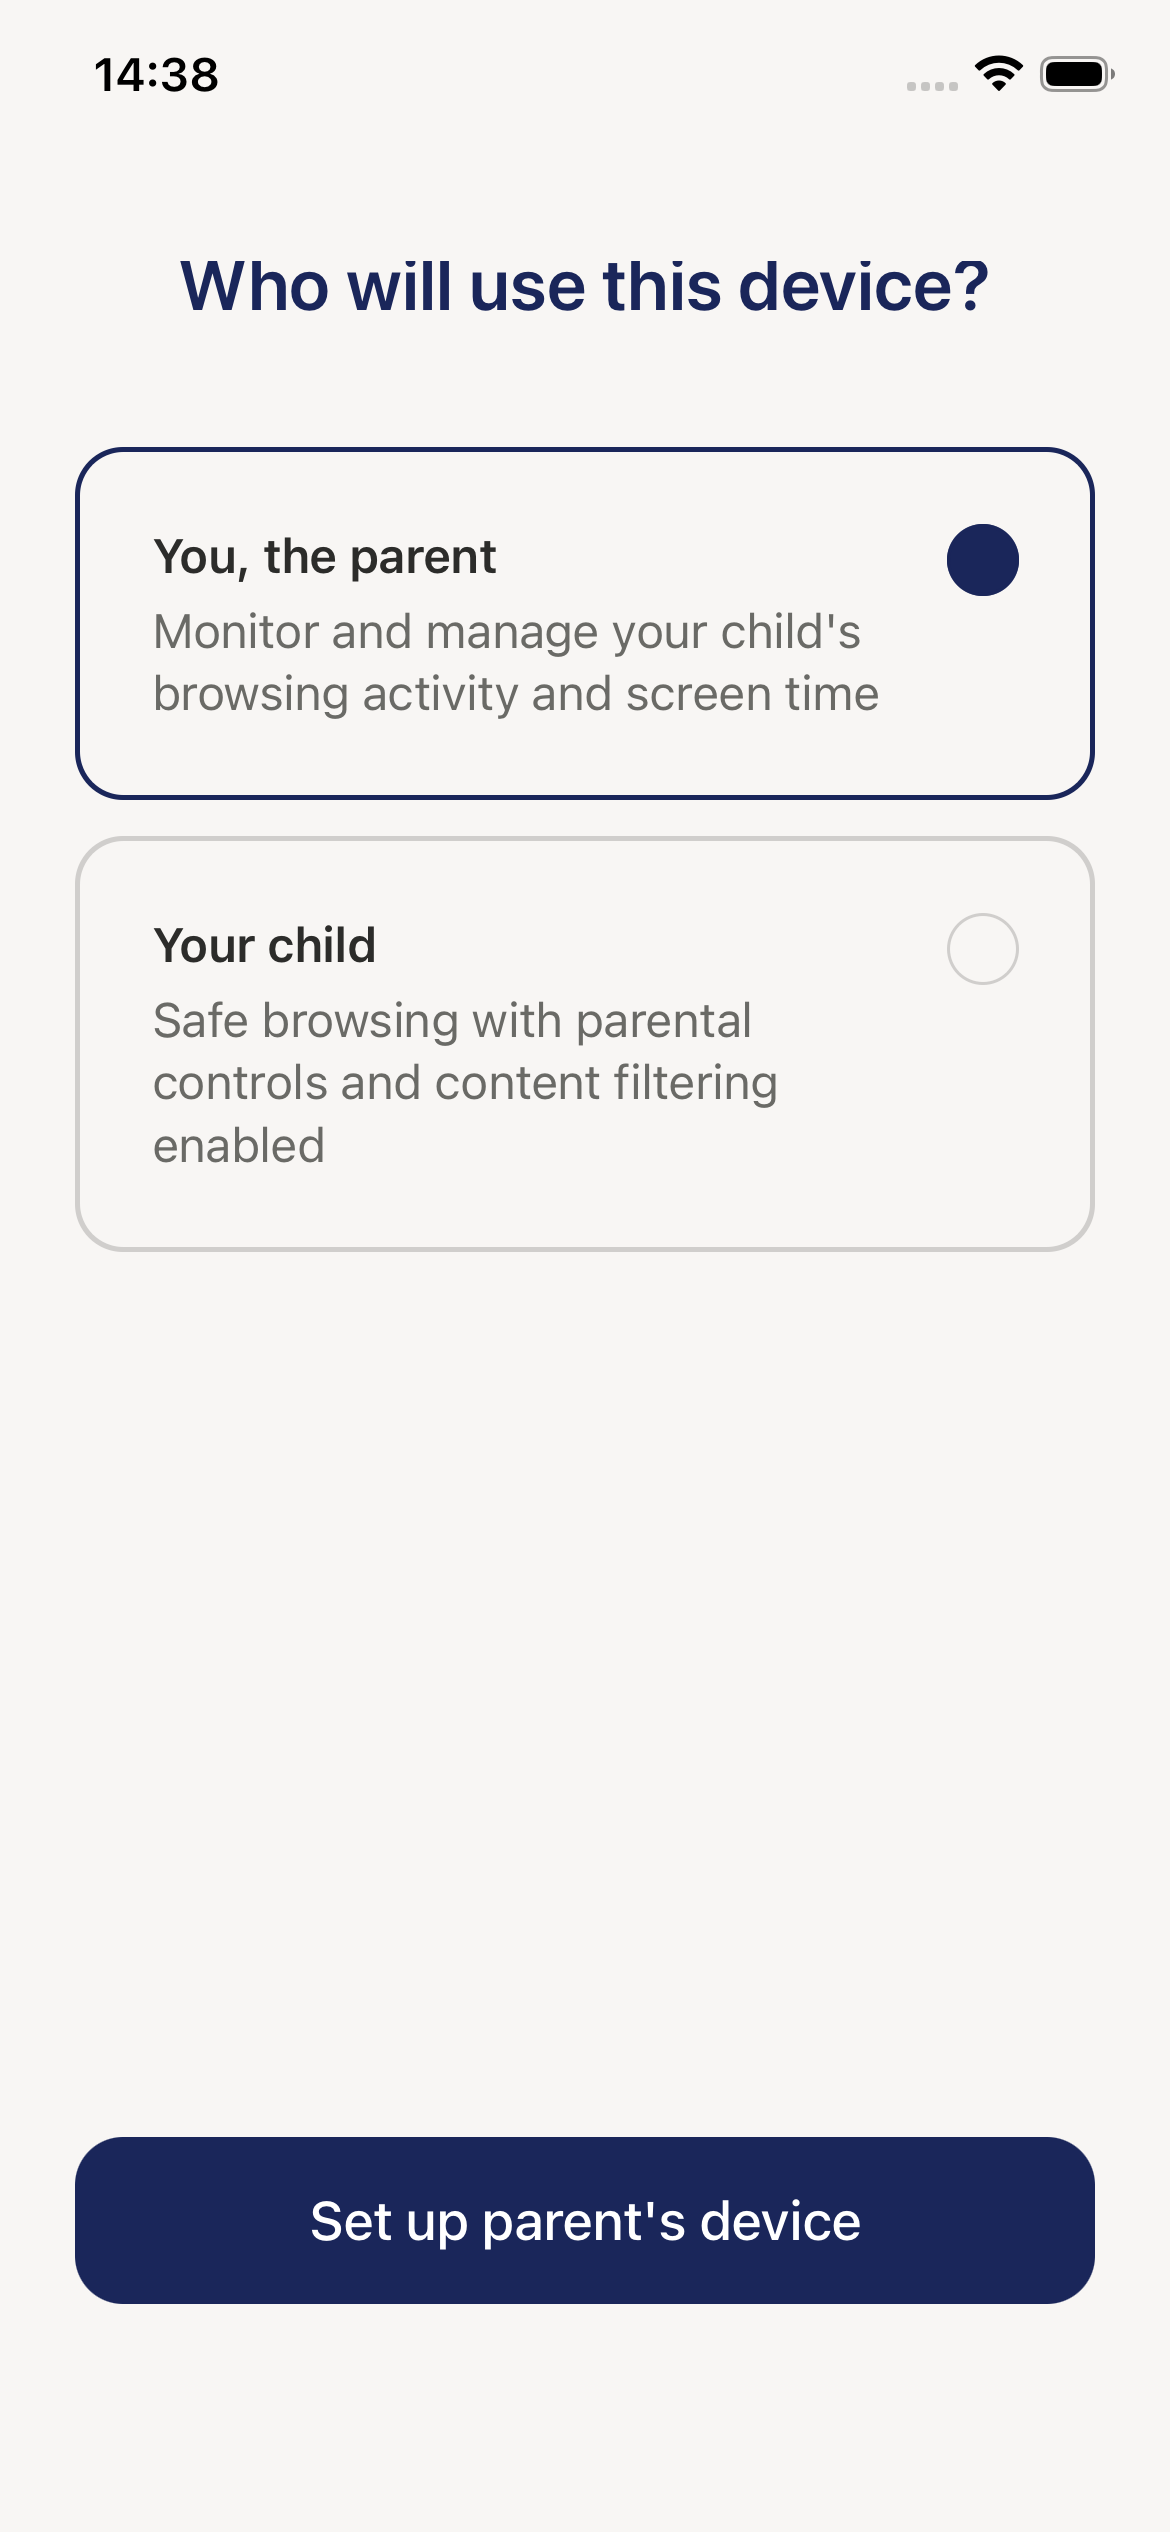
You'll see two buttons:
-
Child's device (purple button)
- Caption: "Web browsing will be restricted and controlled on this device"
- ⚠️ Do not select this option on your device!
-
Parent's device (purple button)
- Caption: "This device will observe and control child's browsing on another device"
- ✅ Select this option to continue as a parent
Tap "Parent's Device"
Tap the "Parent's device" button. The app will:
- Register your device as a parent/control device
- Save this choice (you won't need to select again)
- Take you to the next step: scanning your child's QR code
What Happens Next
After selecting "Parent's device", you'll be taken to a screen where you can scan a QR code from your child's device to establish the connection. We'll cover this in the Pairing Your Devices section next.
Can I change my mind later?
- Once you select "Parent's device," this choice is permanent for this installation
- If you selected the wrong option, you'll need to delete and reinstall the app to choose again
- Make sure you're configuring your own device as the parent device!
What if I have multiple children?
- You can pair multiple child devices to the same parent device
- After pairing your first child, you can add more children from the parent dashboard
- Each child's browsing activity is tracked separately
Do I need a subscription?
- Weblock requires a subscription for parent accounts
- You'll be prompted to subscribe after pairing your first child device
- A free trial period may be available (check the app for current offers)
2. Pairing Your Devices
After you've selected "Parent's device", the next step is to connect your device with your child's device. This creates a secure link that allows you to monitor and control their browsing.
Before You Pair - What You'll See First
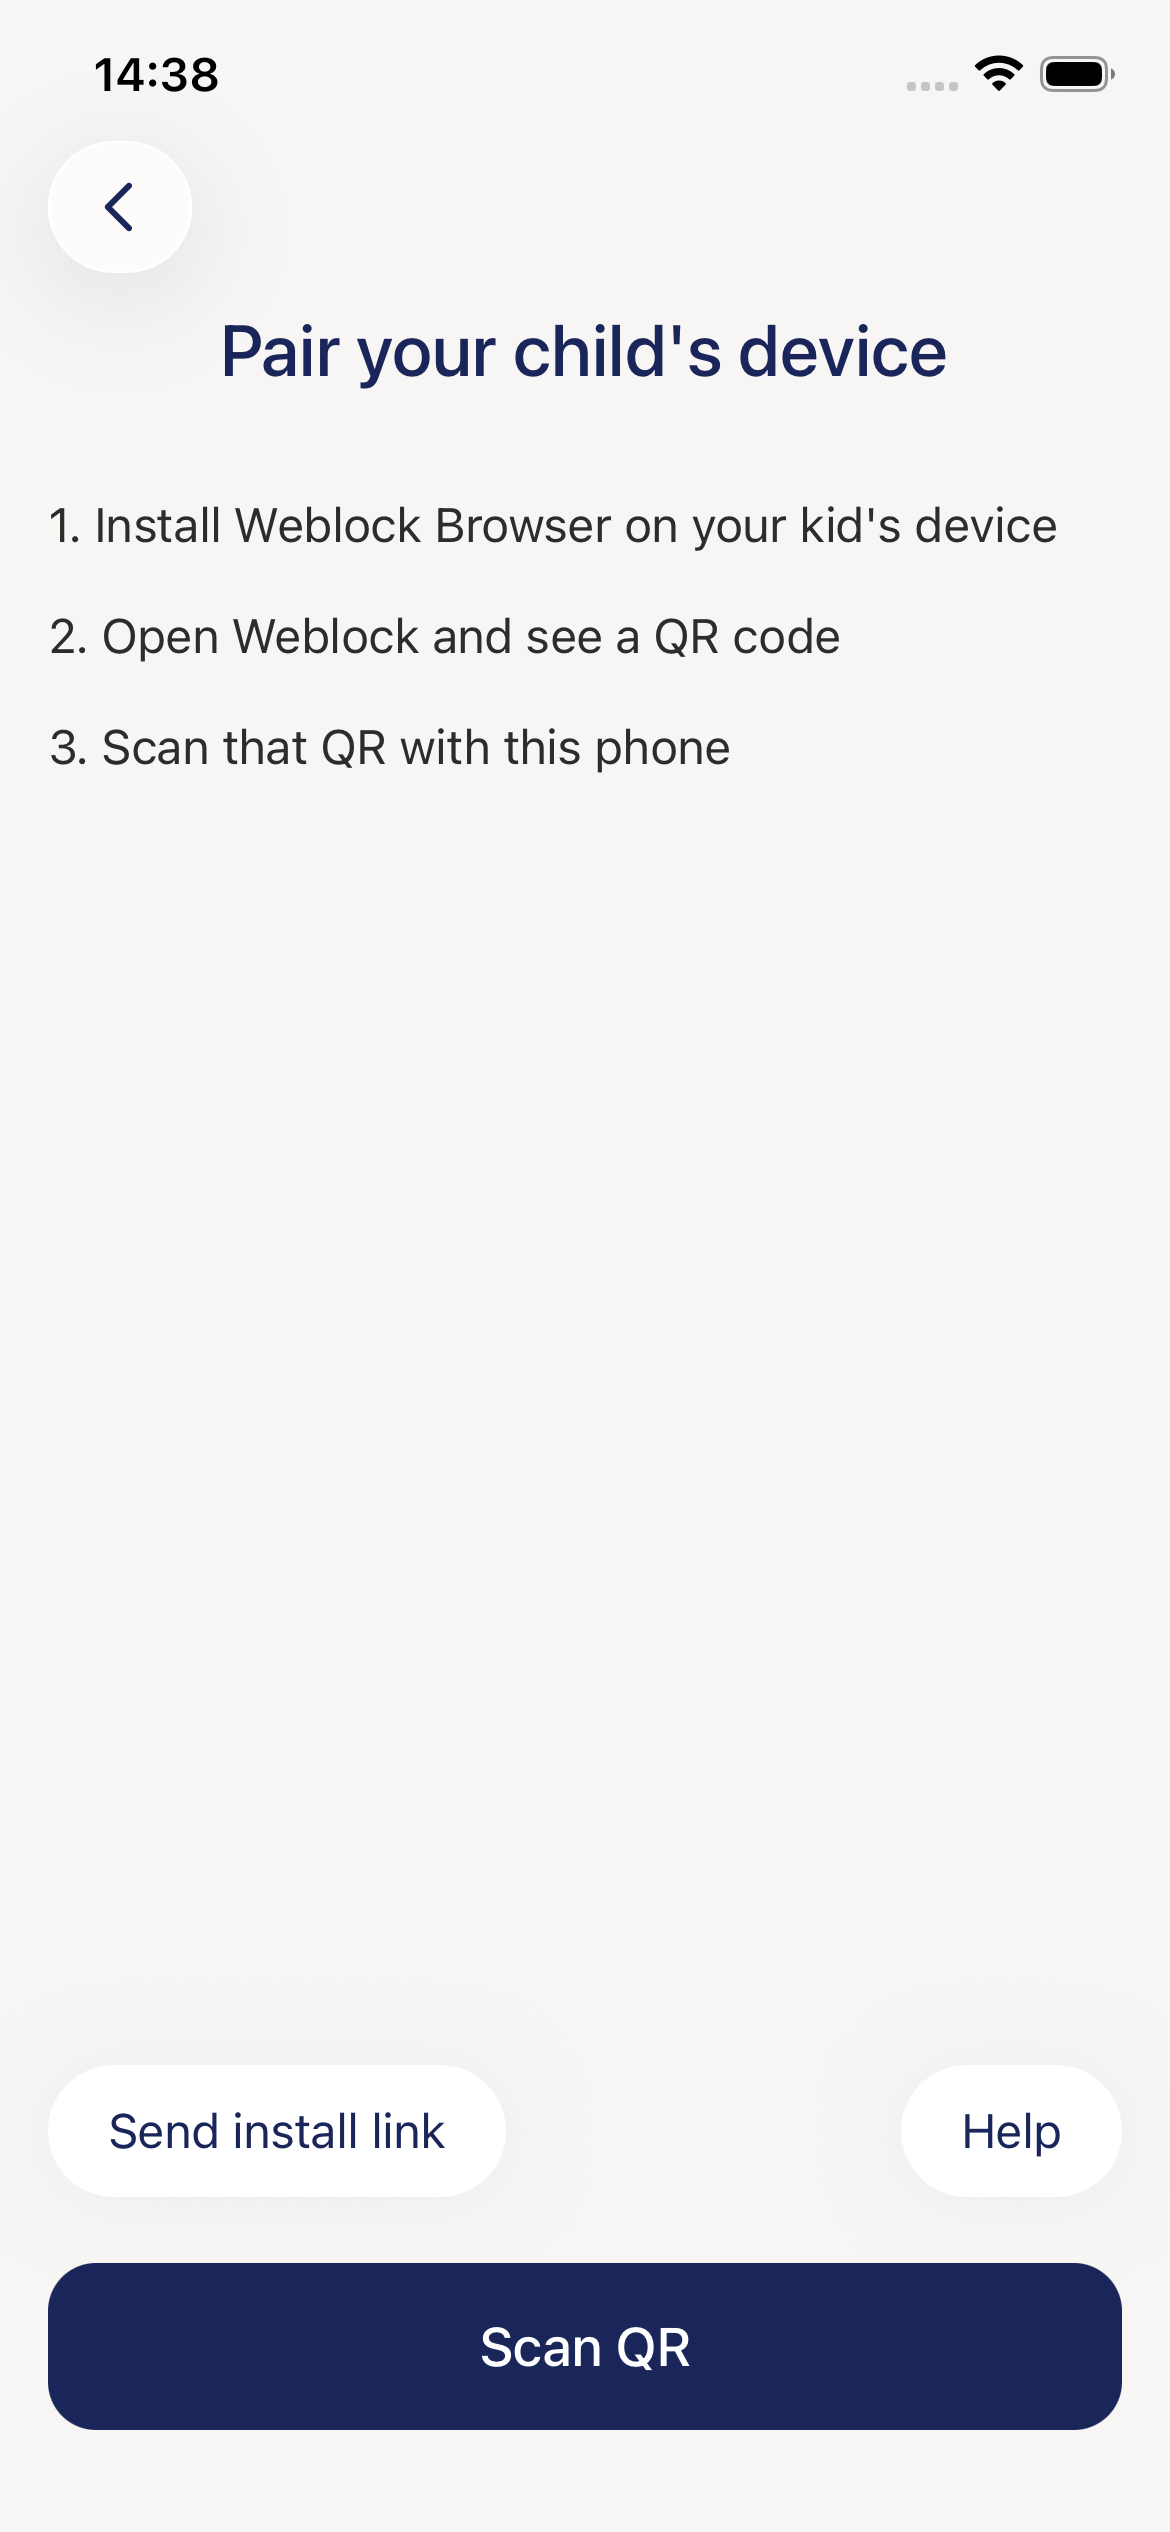
When you first open Weblock after selecting "Parent's device", you'll see the "Pair your child's device" screen.
- "Back" button (top left) - Returns to role selection if needed
- Main heading: "Pair your child's device"
- Three-step instructions:
- Step 1: Install Weblock Browser on your kid's device
- Step 2: Run it and see a QR code
- Step 3: Scan that QR with your phone
- "Share app" link (bottom left) - Send the app download link to your child
- "Help" link (bottom right) - Get additional support
- "Scan QR" button (large purple button) - Opens camera to scan your child's QR code
Overview
The pairing process uses a QR code for security and simplicity:
- Your child's device displays a unique QR code
- You scan that QR code with your device's camera
- The devices connect automatically
- The connection is saved permanently
What Your Child Sees
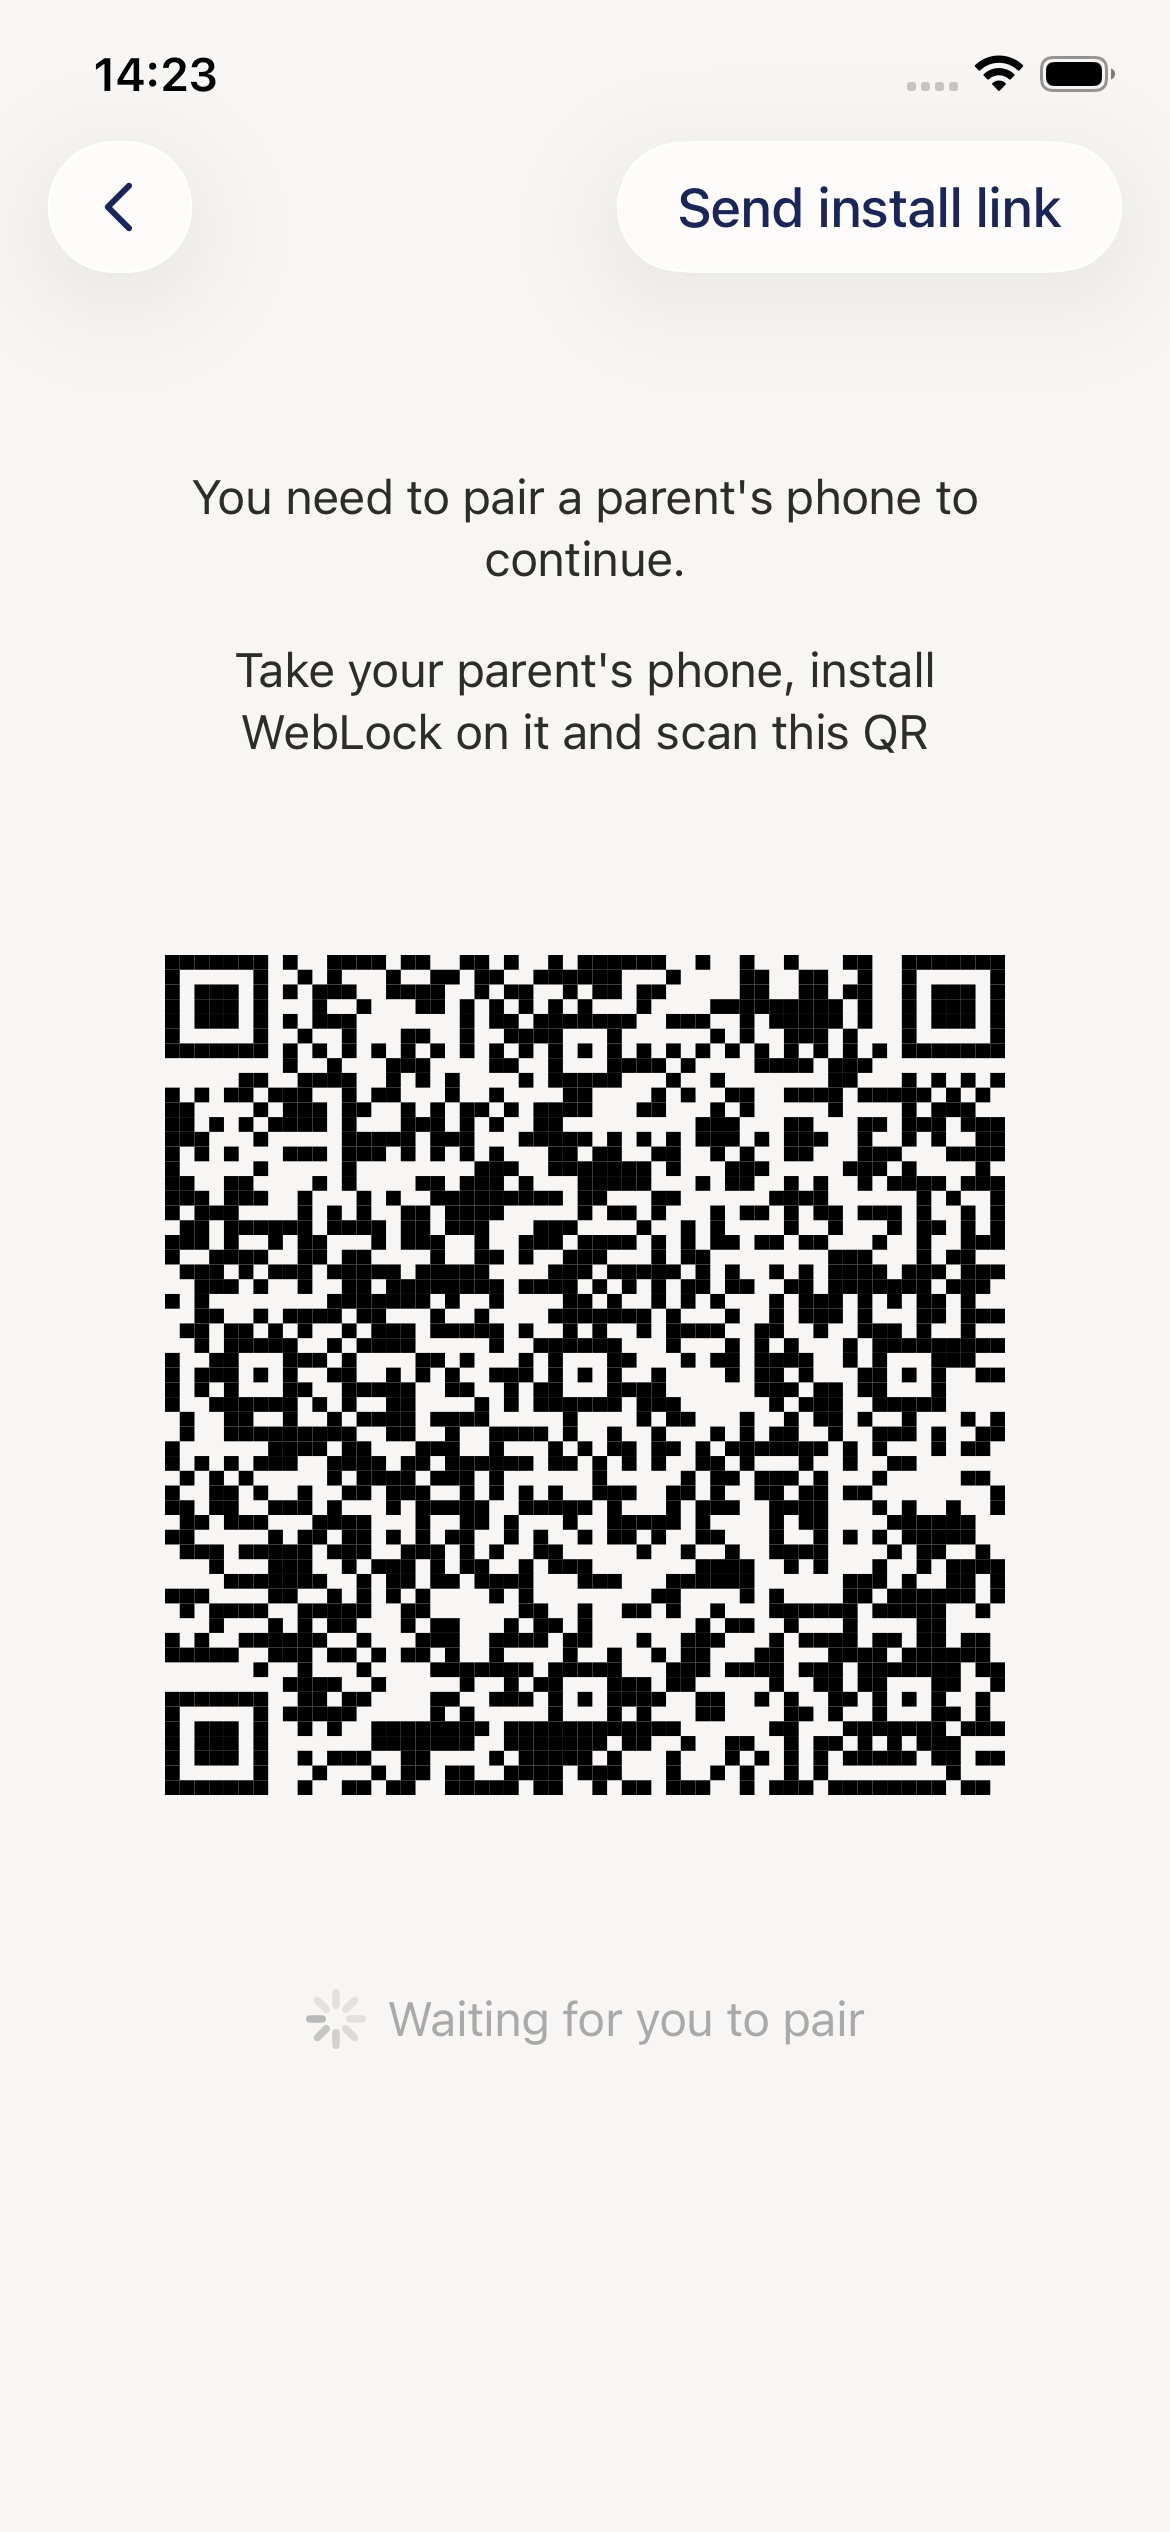
After your child selects "Child's device" on their device, they'll see a screen with:
- A large QR code in the center
- Instructions: "Take your (parent's) phone, install Weblock on it and scan this QR:"
- A "Waiting for you to pair" message with a loading indicator
How to Scan the QR Code
Get Both Devices Ready
- Make sure your child's device is showing the QR code screen
- Ensure both devices have internet connection
- Make sure there's good lighting for the camera
Open the Camera or Scanner
- After selecting "Parent's device", you'll either:
- Be prompted to scan a QR code automatically, or
- Need to tap a "Scan QR Code" button
- Your device's camera will open with a scanner overlay
Scan the QR Code
- Point your camera at the QR code on your child's device
- Hold steady until the camera focuses
- The app will automatically detect and scan the code
- You don't need to tap anything—it happens automatically
Wait for Confirmation
- Both devices will process the pairing
- You'll see a success message when complete
- Your child's device will automatically move to the browser screen
- Your device will proceed to the subscription screen (if needed) or dashboard
- Increase brightness on child's device to maximum
- Clean both device screens (remove fingerprints/smudges)
- Move to a well-lit area
- Hold devices steady and at the right distance (not too close, not too far)
- Make sure the QR code is fully visible in the camera frame
- Check internet connection on both devices
- Make sure both devices have the latest version of Weblock
- Try restarting the app on both devices
- Generate a new QR code by going back and selecting "Child's device" again
- Go to your device Settings → Weblock → Camera
- Enable camera permission
- Return to the app and try again
After Successful Pairing
What Happens Next
Once pairing is complete:
- Your child can start browsing immediately
- You'll be prompted to set up a subscription (required for monitoring)
- After subscribing, you'll access the parent dashboard
- You can pair additional child devices by repeating this process
4. Viewing Browsing History
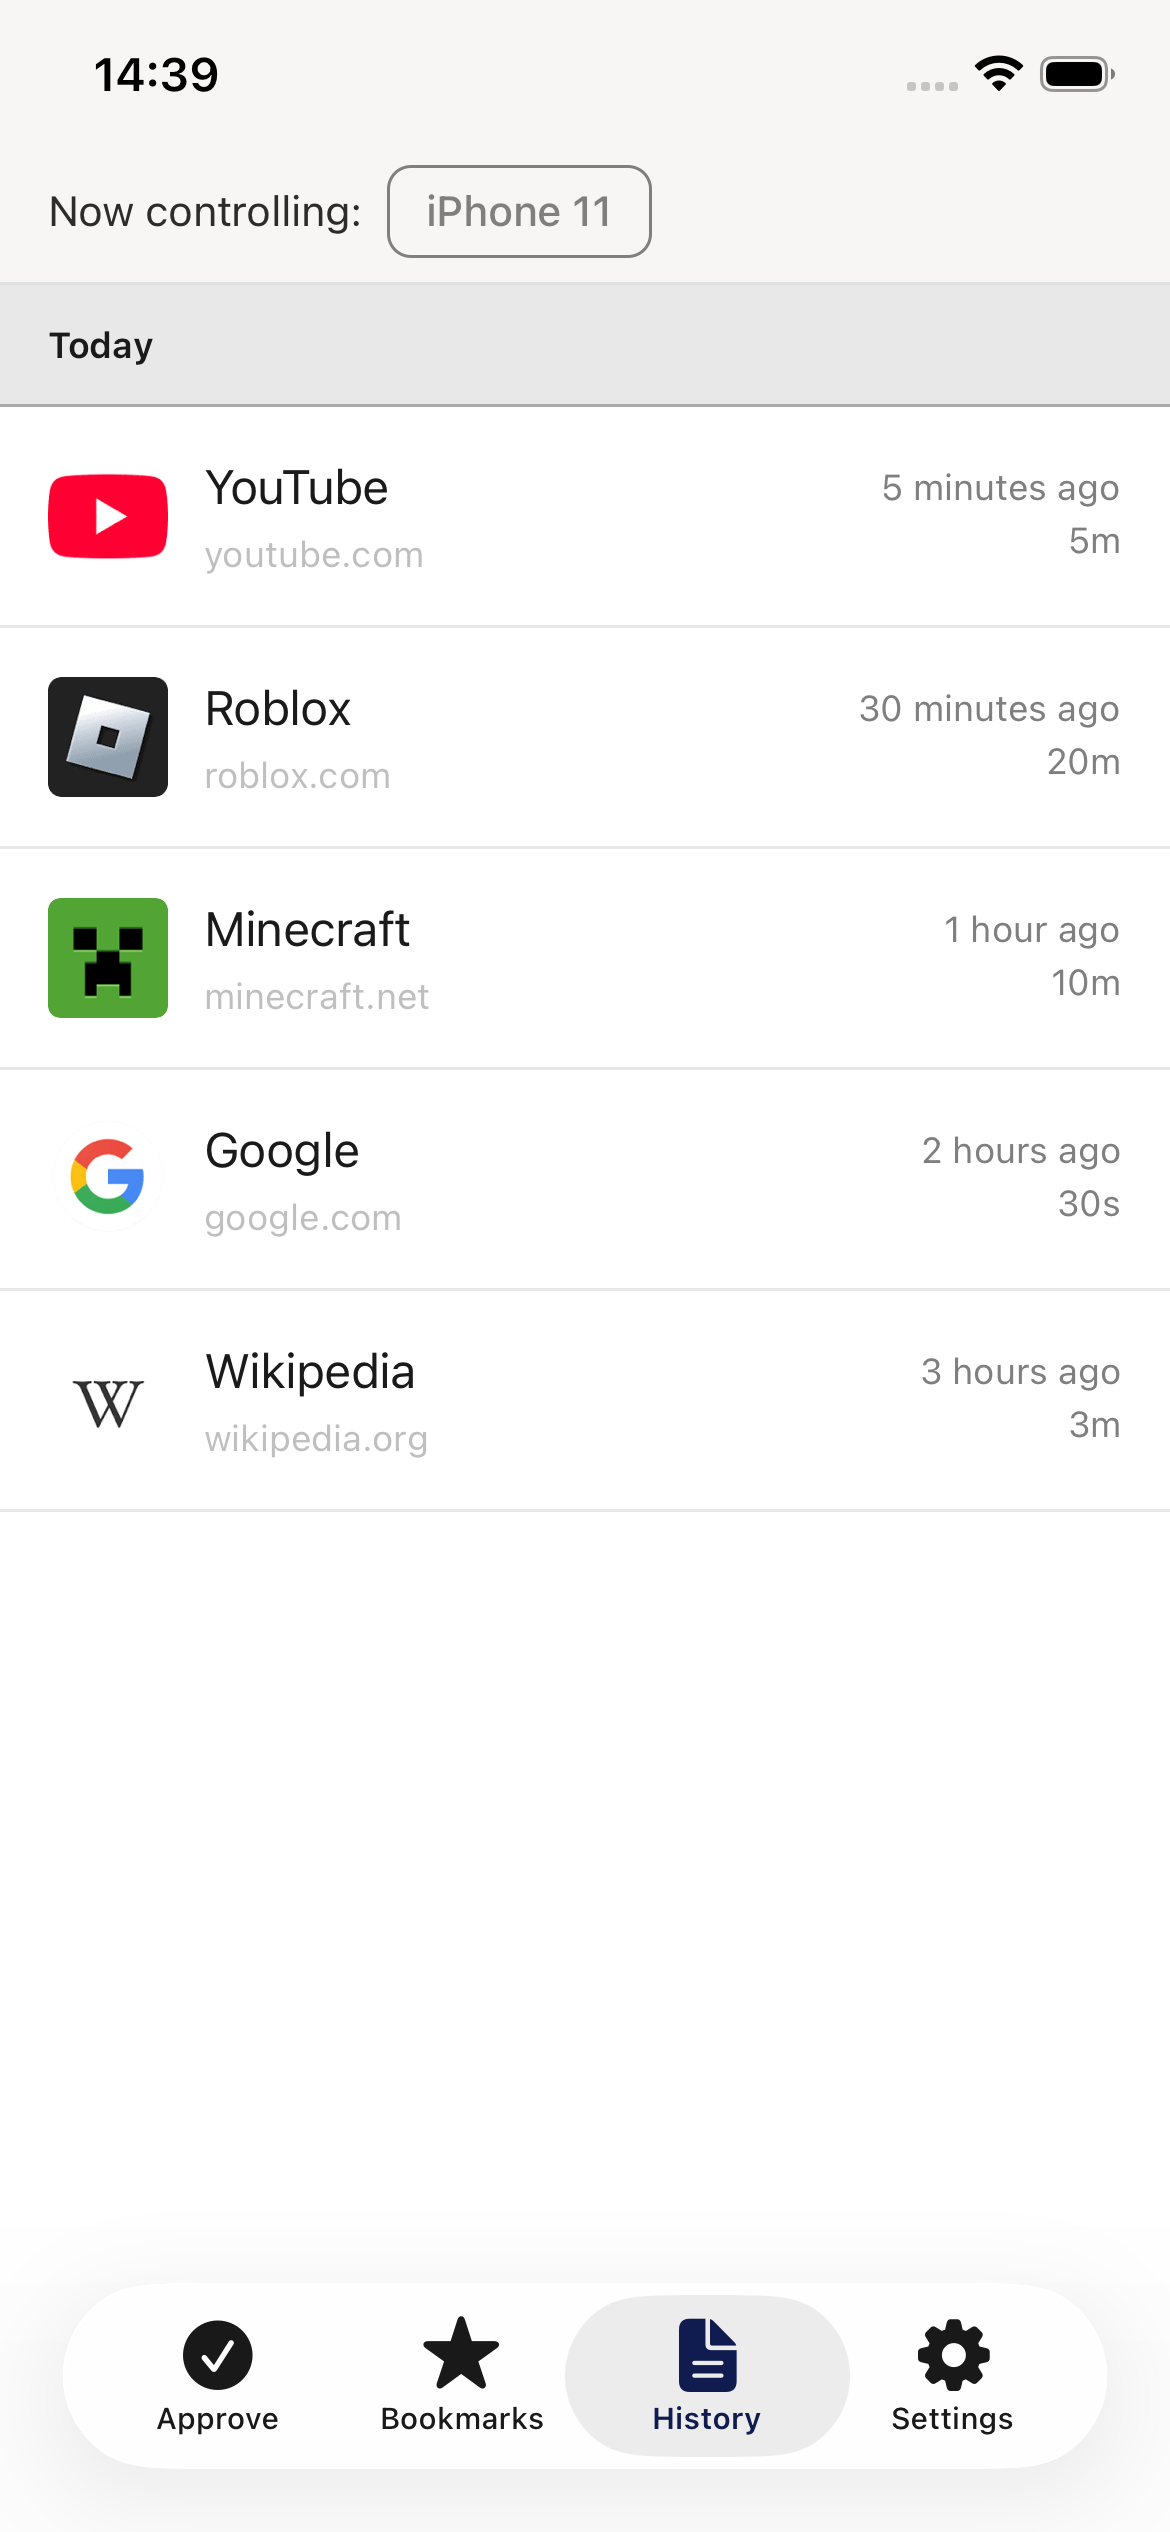
The History tab provides a complete, chronological view of every website your child has visited. This read-only log helps you understand their browsing patterns, identify concerning websites, and have informed conversations about internet safety.
Understanding the History Screen
- "Now controlling:" dropdown - Switch between multiple children's devices if needed
The browsing history is automatically grouped by date with sticky section headers:
- "Today" - Visits from the current day
- "Yesterday" - Visits from the previous day
- Full dates - Older visits show complete dates (e.g., "November 9, 2025")
- Website favicon - Visual icon representing the site
- Page title - The title of the webpage visited (not always the domain name)
- Domain/URL - Website address shown in gray below the title
- Timestamp - When the visit occurred (e.g., "2 days ago", "5 minutes ago", "just now")
- Duration - Time spent on the page (e.g., "15m 10s", "1s") - only shown for approved visits
- Status indicators - Icons showing access status:
- 🔴 Red crossed circle - Access was denied
- ⚪ Grey crossed circle - Access is pending approval
- Star icon - Website is bookmarked
- Duration only - Visit was approved (no icon needed)
How to View History Details
Tap Any History Item
- Tap on any website in the history list
- An action menu appears with one option:
- "Preview" - Opens the website in an in-app browser
- The in-app browser lets you see the site without leaving Weblock
- Tap the close button to return to the history list
Why Preview?
- Verify if a blocked site was actually inappropriate
- Understand the context of your child's browsing
- Check if denied websites should be approved
Understanding Access Status Indicators
Each visit shows its approval status through visual indicators:
- The website was blocked
- Your child was prevented from accessing it
- No duration shown (they couldn't visit the page)
- This might be:
- A site you previously denied
- An automatically blocked inappropriate site
- A site on your block list
- Your child requested access but hasn't received a response yet
- The request is waiting in your Approve tab
- No duration shown (access not granted)
- You can approve or deny it from the Approve tab
- Your child successfully visited the website
- Duration shows how long they spent there
- Examples: "15m 10s" (15 minutes, 10 seconds), "1s" (1 second), "2h 30m" (2 hours, 30 minutes)
- No icon needed - the duration itself indicates approval
- This website is saved in your child's bookmarks
- Can appear alongside any other status
- Means the site is in your approved list
- Your child can access it anytime from their bookmarks
Time and Duration Formats
- "just now" - Less than 1 minute ago
- "5 minutes ago" - Recent visits within the hour
- "2 hours ago" - Earlier today
- "2 days ago" - Recent past days
- Older visits - Shown as weeks, months, or years ago
- Seconds: "1s", "45s" (under 1 minute)
- Minutes and seconds: "5m 30s", "15m 10s" (under 1 hour)
- Hours and minutes: "2h 30m", "1h 15m" (1 hour or more)
- Hours only: "3h" (exactly on the hour)
Note on Short Durations
Very short durations (like "1s") might indicate:
- Page opened but immediately closed
- Quick redirects
- Accidental clicks
Features and Capabilities
Automatic Date Grouping
- History is organized into date sections
- Section headers remain visible as you scroll (sticky headers)
- Makes it easy to review activity by day
- Today and Yesterday get special labels
Infinite Scroll
- Initially loads 50 most recent visits
- Automatically loads 50 more as you scroll down
- Continues until all history is displayed
- Loading indicator appears at bottom while fetching
Pull to Refresh
- Swipe down on the history list to refresh
- Reloads the most recent activity
- Useful for checking new visits in real-time
Read-Only View
- History cannot be edited or deleted
- Provides a permanent record of browsing activity
- Acts as an audit log for accountability
Empty State
If no browsing history exists, you'll see:
"No browsing history for [child name] yet"
This means:
- Your child hasn't browsed any websites yet
- They just started using Weblock
- History will appear here as they browse
Tips for Reviewing History
Do:
- Review history regularly (e.g., once a day or weekly)
- Look for patterns in browsing behavior
- Check duration to understand engagement with content
- Use history as a conversation starter about internet safety
- Preview unfamiliar websites to understand their content
- Note which denied sites your child is trying to access repeatedly
Don't:
- Obsessively check every single visit (respect reasonable privacy)
- React emotionally to every blocked attempt (some are accidental)
- Punish without understanding context (ask about the visit first)
- Ignore patterns of concerning behavior (address repeated issues)
- Forget that short durations might be accidental clicks
What the History Doesn't Show
Not Recorded:
- Specific pages within a website (only domains are logged)
- Incognito/private browsing (Weblock doesn't support private mode)
- Content consumed on the page (videos watched, articles read, etc.)
- Form data or passwords entered
- Downloads or uploaded content
What You See:
- Domain visited (e.g., "youtube.com", not specific video)
- Page title (which may indicate content, like "How to code Python")
- Time of visit
- Duration on the page
- Approval status
Privacy and Trust Balance
Use History Responsibly
The History tab is a powerful monitoring tool, but use it responsibly:
- Communicate openly: Let your child know you can see their history
- Build trust: Review together sometimes and discuss findings
- Respect privacy: Not every visit needs investigation
- Focus on safety: Use history to protect, not to invade
- Age-appropriate: Adjust monitoring intensity as your child matures
Remember: The goal is to keep your child safe while teaching responsible internet habits, not to spy on every action.
5. Approving Website Requests
When your child tries to visit a website that hasn't been approved yet, they'll see a blocked page with a "Request Access" button. This section explains how this approval workflow works from both perspectives.
How It Works
From Your Child's Perspective
- Blocked Page: When your child tries to visit a new or blocked website, they see a "Page is not allowed" screen showing the website address
- Request Access: They can tap a purple "Request Access" button to send you a request
- Waiting State: The button changes to "Waiting for approval..." with a spinner, and they can continue browsing other approved sites while waiting
- Notification: You receive a notification on your device about the pending request
From Your Perspective
Once you receive a request, you'll be able to:
- Approve it permanently - The website becomes accessible indefinitely
- Approve temporarily - Grant access for a limited time (1 hour, 1 day, etc.)
- Deny it - Keep the website blocked
- Add as bookmark - Approve and add to their bookmarks for easy access
Important: Response Times Matter!
Your child will be waiting for your decision, so try to review requests promptly when possible.
What Your Child Sees
For a detailed explanation of what your child experiences during this process, see the Requesting Access to Websites section in the Child's Guide. You can also read about Understanding Website Blocks to understand how blocked pages are explained to children.
The child's guide covers:
- When the blocked page appears
- How to use the "Request Access" button
- What happens while waiting for approval
- Tips for responsible requesting
- What to do if a request is denied
Best Practices for Handling Requests
Do:
- Review requests promptly when possible
- Consider the context and reason for the request
- Explain your decisions (especially denials) to help your child understand
- Use temporary approvals for uncertain websites
- Add frequently-used appropriate sites as bookmarks
Don't:
- Leave requests unanswered for extended periods
- Deny everything without discussion
- Approve inappropriate content just to avoid conflict
- Forget to explain why certain sites aren't appropriate
The Approve Screen
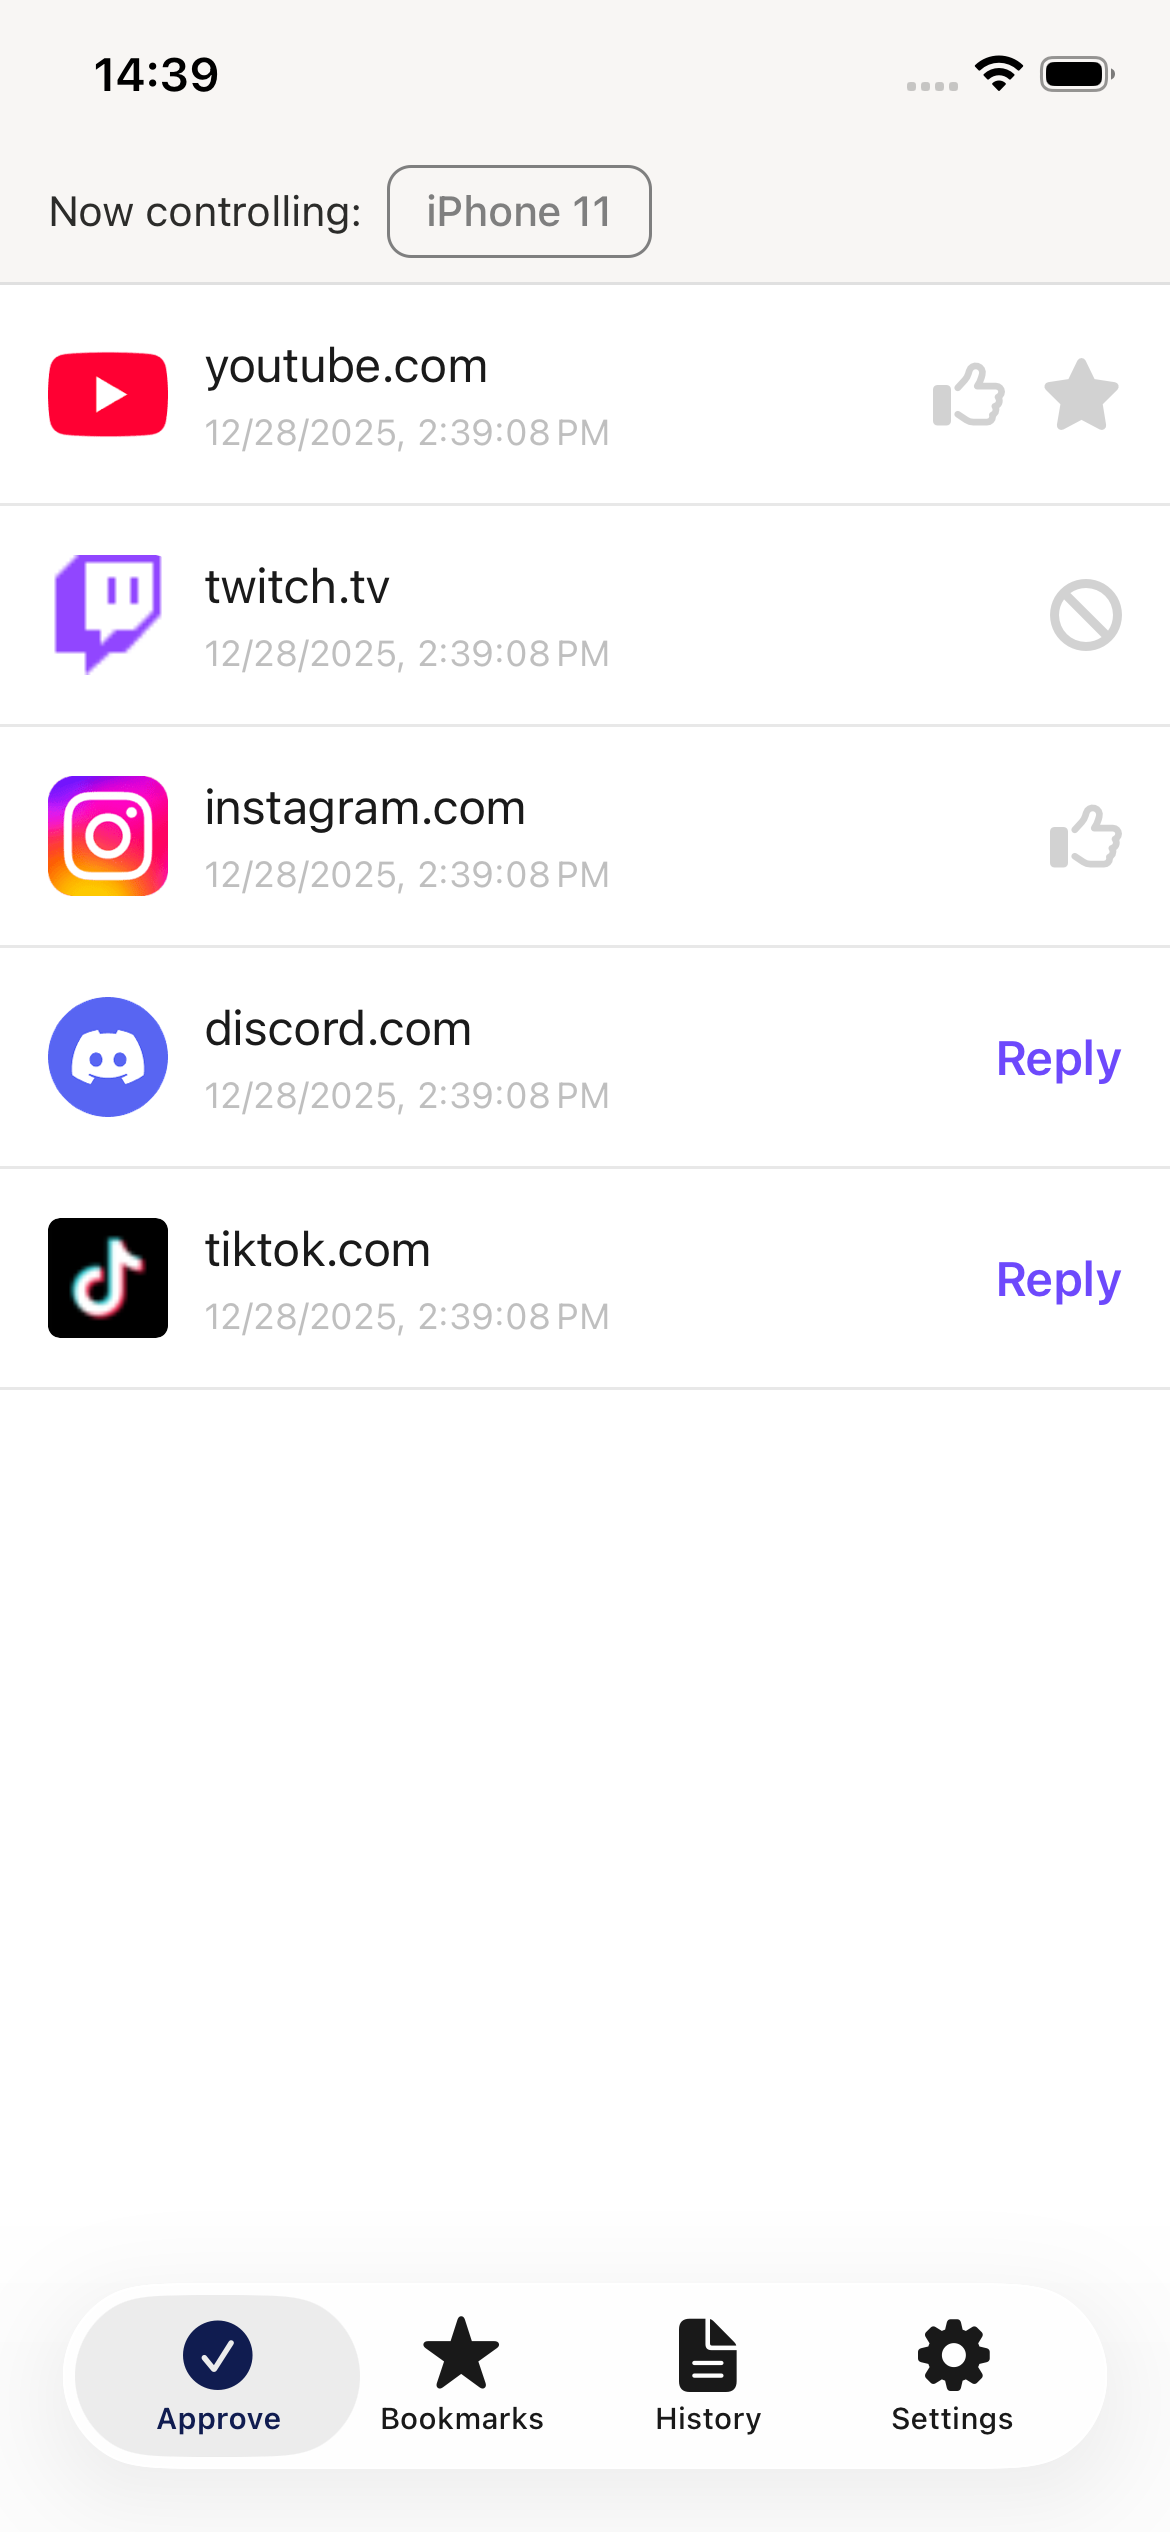
The Approve tab is where you'll spend most of your time managing your child's browsing requests. This screen displays all website access requests from your child, organized in a list with the most recent at the top.
Understanding the Interface
- "Now controlling:" dropdown - If you have multiple children, use this to switch between their devices
- Shows the currently selected child's device name
Each request shows:
- Website favicon - Visual icon for the website (or colored letter if no icon available)
- Website URL - Domain name (without http:// or https://)
- Timestamp - When the request was made (e.g., "11/11/2025, 2:01:26 PM")
- Status indicator - Shows the current state of the request:
- "Reply" button - Request is pending and waiting for your response
- Thumbs-up icon (grey) - Request has been approved
- Crossed circle icon (grey) - Request has been denied
- Star icon (grey) - Website has been added to bookmarks
- Approve (currently active) - This tab
- Bookmarks - Manage saved websites
- History - View browsing history
- Settings - App configuration
How to Respond to Requests
There are three ways to interact with approval requests:
Method 1: Tap the "Reply" Button
For pending requests (showing the purple "Reply" button):
- Tap the "Reply" button
- An action menu appears with your options
- Select your response
Method 2: Tap Anywhere on the Request
For any request (pending, approved, or denied):
- Tap anywhere on the request item
- An action menu appears with context-appropriate options
- Select your response
Method 3: Swipe Gestures (Quick Actions)
For fast responses:
- Swipe right → Quick approve (permanent)
- Swipe left → Quick deny
Action Menu Options
When you tap a request, you'll see an action menu with the following options (availability depends on current state):
- View website - Preview the website in an in-app browser before deciding
- Approve - Grant permanent access to this website
- Approve for... - Grant temporary access with time limit:
- 15 minutes
- 1 hour
- 3 hours
- Today (until midnight)
- Deny - Block access to this website
- Cancel - Close the menu without taking action
- View website - Preview the website in an in-app browser
- ✓ Approved (disabled) - Shows current approval status
- Add as bookmark - Save this website to the child's bookmarks for easy access
- Changes to ⭐ Bookmarked if already added
- Deny - Revoke access to this website
- Cancel - Close the menu without taking action
- View website - Preview the website in an in-app browser
- Approve - Grant permanent access to this website
- Approve for... - Grant temporary access with time limit
- 🚫 Denied (disabled) - Shows current denial status
- Cancel - Close the menu without taking action
Understanding Approval Types
- The website becomes accessible indefinitely
- No expiration date
- Can be revoked at any time by denying the request again
- Consider adding frequently-used appropriate sites as bookmarks
When you select "Approve for...", choose a time limit:
- 15 minutes - Quick access for a specific task
- 1 hour - Homework or short browsing session
- 3 hours - Extended project work
- Today - Access until midnight tonight
After the time expires, the website will be blocked again automatically. Your child will need to request access again if they want to revisit it.
Best use cases for temporary approval:
- Uncertain about website appropriateness
- One-time research or school project
- Testing if content is age-appropriate
- Websites you don't want to bookmark but need temporarily
Refreshing the List
To check for new requests, pull down on the list to refresh. The list will reload with any new pending requests.
Empty State
If you see a message like:
"No approval requests from [child name] yet.
When [child name] requests access to a website, you'll see it here."
This means:
- Your child hasn't requested any website access yet
- They're browsing only approved or bookmarked websites
- The list will populate automatically when requests are made
6. Managing Bookmarks
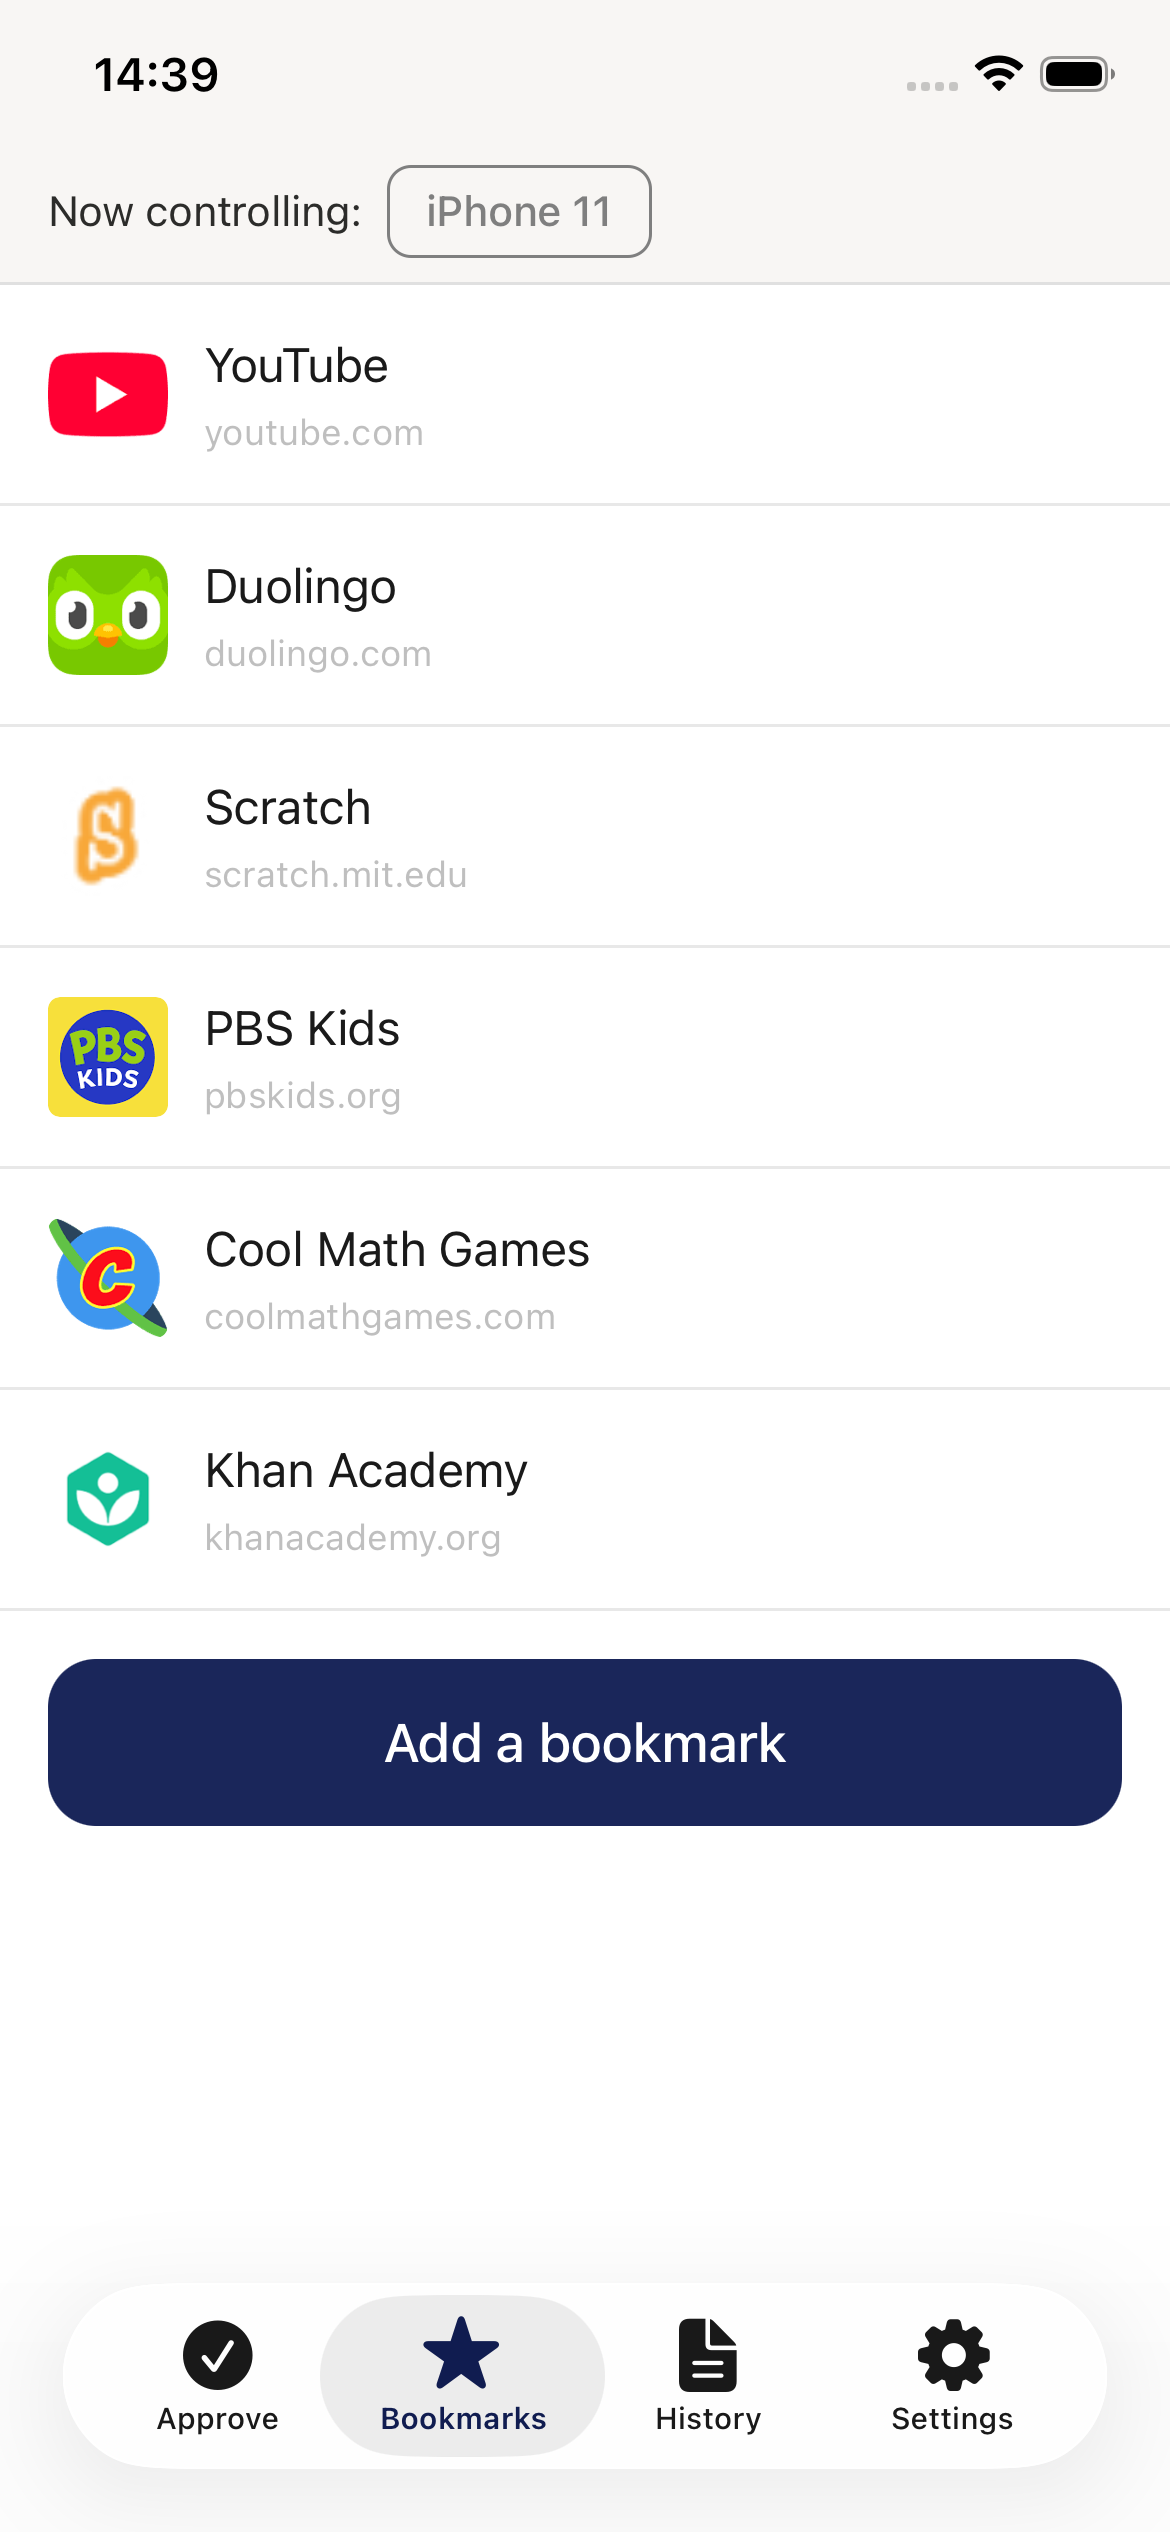
The Bookmarks tab allows you to manage a curated list of approved websites for your child. These bookmarks appear in your child's Weblock Browser app, providing quick access to safe, parent-approved websites.
Understanding the Bookmarks Screen
- "Now controlling:" dropdown - Switch between multiple children's devices if you have more than one
Each bookmark displays:
- Website favicon - Visual icon or colored letter representing the site
- Title - Bold name you've given the bookmark (e.g., "dirty.ru", "Test")
- URL - Domain name shown in gray below the title
- Last visited - Right side, showing when your child last visited (e.g., "2 days ago")
- Last visit duration - Time spent on the site during last visit (e.g., "15m 10s")
- Time remaining - Red text showing expiration countdown for temporary approvals (e.g., "1s left", "15m 10s left")
- "+ Add a bookmark" button - Large purple button to create new bookmarks
- Navigation tabs - Approve, Bookmarks (active), History, Settings
How to Manage Bookmarks
There are three main ways to interact with bookmarks:
Method 1: Create a New Bookmark
- Tap the "+ Add a bookmark" button at the bottom of the list
- The Edit Bookmark modal appears
- Fill in the details (see "Edit Bookmark Modal" section below)
- Tap "Save bookmark"
Method 2: Edit an Existing Bookmark
- Long press on any bookmark in the list
- The Edit Bookmark modal appears with pre-filled information
- Modify the URL or title as needed
- Tap "Save bookmark" to update
Method 3: Delete a Bookmark
Option A: Swipe to Delete
- Swipe left on the bookmark you want to remove
- A red "Delete" button appears
- Tap "Delete"
- Confirm deletion in the alert dialog
Option B: Delete from Edit Modal
- Long press the bookmark to open edit modal
- Tap the "Delete" button at the bottom
- Confirm deletion in the alert dialog
The Edit Bookmark Modal
When creating or editing a bookmark, you'll see a modal with two fields:
- Enter the complete website address
- Examples: "https://example.com" or just "example.com"
- Auto-correction: If you enter a domain without "https://", it will be added automatically
- Type "reddit.com" → Becomes "https://reddit.com"
- Preview link: Once you enter a valid URL, a "Preview" link appears - tap it to view the website in an in-app browser
- Validation: Shows "Bad address" in red if the URL is invalid
- Give the bookmark a friendly name
- Auto-generation: If you leave this empty, the app automatically creates a title from the domain
- "reddit.com" → "Reddit"
- "youtube.com" → "Youtube"
- You can always customize this to something more descriptive
- "Save bookmark" (blue) - Creates or updates the bookmark
- "Delete" (white, edit mode only) - Removes the bookmark with confirmation
- Tap outside or swipe down - Closes the modal without saving
Understanding Temporary Approvals
What Are Temporary Approvals?
Some bookmarks show a red "time remaining" indicator (e.g., "15m 10s left", "1s left"). These are temporary approvals created when you approve a website request with a time limit.
- Your child requests access to a website
- You approve it using "Approve for..." and select a duration:
- 15 minutes
- 1 hour
- 3 hours
- Today (until midnight)
- A bookmark is automatically created with an expiration time
- The red countdown shows how much time remains
- Your child can access the website until the timer expires
- After expiration, the bookmark remains but access may be restricted
- You can manually delete expired bookmarks or keep them for future reference
Time Display Formats:
- Seconds: "1s left", "45s left"
- Minutes: "5m left", "15m 10s left"
- Hours: "2h left", "3h 30m left"
- Days: "2d left", "5d 12h left"
Additional Features
Pull to Refresh:
- Swipe down on the bookmark list to refresh
- Updates last visited times, durations, and time remaining
If you haven't added any bookmarks yet, you'll see:
"No bookmarks for [child name] yet.
Add bookmarks and [child name] will see them in Weblock Browser."
The "+ Add a bookmark" button is always available to get started.
Tips for Managing Bookmarks
Do:
- Add frequently-visited educational websites
- Use descriptive titles that your child will recognize
- Preview websites before bookmarking to ensure they're appropriate
- Review and update bookmarks periodically
- Use temporary approvals for questionable content to test appropriateness
Don't:
- Bookmark every website your child visits (keep the list manageable)
- Use technical URLs as titles (make them child-friendly)
- Forget to explain to your child what each bookmark is for
- Leave expired temporary approvals cluttering the list
What Your Child Sees
All bookmarks you create here appear in your child's Weblock Browser app. They'll see:
- The same titles and favicons
- Easy one-tap access to approved websites
- A curated list of safe websites you've selected
For more details on how bookmarks work from the child's perspective, see the Using Bookmarks section in the Child's Guide.
7. Settings and Account
The Settings tab provides essential information about your device and account, along with quick access to help and legal documents.
What You'll Find
- Device ID — Your unique parent device identifier. You may need this when contacting support.
- App Version — The current version of Weblock installed on your device.
- Build — The specific build number, useful for troubleshooting.
- Help — Opens the Weblock help center in your browser for FAQs and support articles.
- Terms and Privacy Policy — View our legal documents and understand how we protect your data.
- Delete Account — Permanently remove your account and all associated data.
Getting Help
Tap the Help button to visit our online support center. You'll find:
- Answers to frequently asked questions
- Troubleshooting guides
- Contact information for support
Deleting Your Account
If you need to delete your Weblock account:
- Tap Delete Account (shown in red)
- A confirmation dialog will appear
- Type YES (in capitals) to confirm
- Tap OK to proceed
Warning
This action is permanent and cannot be undone. Deleting your account will:
- Remove all your data from our servers
- Unpair all connected child devices
- Cancel any active subscription
- Sign you out of the app
Tips
- Save your Device ID before contacting support — it helps us locate your account quickly
- Check your app version when reporting issues — we may have already fixed the problem in a newer update
- Review the Privacy Policy to understand how we handle your family's data
Tips for Parents
Before You Continue
- Have both devices ready: You'll need your child's device nearby for the pairing process
- Ensure internet connection: Both devices should be connected to the internet
- Talk to your child: Explain that Weblock helps keep them safe online, not to spy on them
- Set expectations: Discuss which websites are appropriate and why you're using parental controls
Do:
- Review browsing history regularly
- Approve legitimate requests promptly
- Discuss questionable content calmly
- Adjust restrictions as your child matures
- Use Weblock as a teaching tool for internet safety
Don't:
- Block everything (be reasonable)
- Check history obsessively (respect some privacy)
- Punish without context (discuss first)
- Leave requests unanswered for long periods
- Share account access with others
Next Steps
Now that you've set up your device as a parent device, you're ready to:
- Pair with your child's device - Scan the QR code from your child's device (documentation continues as more screenshots are added)
- Set up your subscription - Complete payment to activate monitoring
- Explore the parent dashboard - Familiarize yourself with the control interface
More Documentation Coming Soon
This guide is being updated incrementally with more screenshots and detailed instructions for each feature. Check back soon for complete documentation on pairing, approving requests, viewing history, and more!